User Guide
Table Of Contents
1. Introduction
1.1. Overview
2. Quick start
3. About
4. Features
4.1. Navigating InternHunter
4.1.1. Switching tabs: switch
4.2. Company
4.2.1. Adding a company: add com
4.2.2. Deleting a company: delete com
4.2.3. Editing a company’s particulars: edit com
4.2.4. Viewing a company’s particulars in full: view com
4.2.5. Finding companies: find com
4.2.6. Listing all companies: list com
4.3. Internship
4.3.1. Adding an internship to a company: add int
4.3.2. Deleting an internship from a company: delete int
4.3.3. Modifying an internship’s details: edit int
4.4. Application
4.4.1. Applying for an internship: add app
4.4.2. Deleting an application: delete app
4.4.3. Updating an application: edit app
4.4.4. Viewing an application’s details in full: view app
4.4.5. Finding applications: find app
4.4.6. Listing all applications: list app
4.5. Profile
4.5.1. Adding an item to profile: add me
4.5.2. Deleting an item from your profile: delete me
4.5.3. Updating profile item details: edit me
4.5.4. Viewing a profile item’s details in full: view me
4.5.5. Finding items in profile: find me
4.5.6. Listing all profile items: list me
4.6. Finding the most suitable internships
4.6.1. Generating matching internships: match
4.7. General
4.7.1. Clearing all entries: clear
4.7.2. Viewing help: help
4.7.3. Exiting the program: exit
5. FAQ
6. Command Summary
Introduction
InternHunter is a CLI-centric* desktop application which aids university students in applying for internships. It lets you manage your own customisable collection of companies, internships, internship applications and your user profile, so that you can keep track of internships that you are interested in - all from one centralised place.
Never lose track of a good internship opportunity again.
This User Guide will help you find out about what InternHunter is and how to use it. It’ll get you started with the app in your pursuit to land that desired internship.
Let’s dive in.
*If you’re unfamiliar with Command-Line Interfaces (CLIs), you can find out about them here!
Overview
You’re searching for an internship.
You’ve got 101 tabs open in Chrome.
You’re viewing multiple internship listings and companies’ details, comparing salaries and job requirements across webpages all while trying to recall your own skill set and finding what role best suits you.
It’s a mess.
InternHunter is here to fix that. Here’s how:
InternHunter lets you record crucial information that you would want to keep track of during your internship hunting process by managing a collection of four types of items:
| Item | Alias | Attributes | What it represents |
|---|---|---|---|
| Company | com | company name, phone number, email, address, industry types, internships | A company offering internships |
| Internship | int | company name, job title, period, wage, requirements | An internship offered by a company |
| Application | app | internship, status, status date | An internship application that you applied for |
| Profile Item | me | category, title, descriptors | An item in your profile |
And here’s what you can do:
- When you find a company that you are interested in, add it to your list of companies with the:
add comcommand - Next, note down the internships offered by that company that interest you with the:
add intcommand - And once you’ve applied for an internship, record it down to keep track of it with the:
add appcommand
You can also keep track of your achievements, experience and skills in your own profile. Along with the skills matching feature, it will aid you in creating a tailored resume for each application and figure out which internship is the best fit for you.
Simple? Well that’s the InternHunter flow.
Now, along the way you’re probably going to want to edit, delete and look through your collection of items - InternHunter supports all those features and more.
Ready to begin? Let’s get hunting.
Quick start
-
Ensure you have Java
11or above installed in your Computer. -
Download the latest
[CS2103T-T15-4][InternHunter].jarhere. -
Copy the file to the folder you want to use as the home folder for InternHunter.
-
Double-click the file to start the app or run
java -jar [CS2103T-T15-4][InternHunter].jarfrom the terminal. -
Refer to About to understand certain terminologies and usage of InternHunter.
-
The Features available in the current version of InternHunter are listed below.
About
This section will bring you through the Graphical User Interface(GUI), technical terminologies, as well as commonly used symbols.
Understanding the GUI

Understanding the technical terminologies
| Word | What it means |
|---|---|
| Commands | Words that determine the action of InternHunter. |
| Command word | The first word of every command. |
| Parameters | Information that is supplied by you. |
| Execute | Typing the information into the command box and pressing enter. |
| Item type for command | com, int, app, me. |
Understanding the symbols
| Symbol | What it means |
|---|---|
| Important information to take note. | |
| Extra tip. | |
| Warning. | |
add |
Words that have a grey highlighted background are commands that can be keyed into the command box. |
| italics | Words in italics represent additional information. |
Understanding the usage of the commands
![]() Notes about the commands:
Notes about the commands:
-
The command word and the item type for the command are case-sensitive.
-
Words in
UPPER_CASEare the parameters to be supplied by you.
e.g. inadd com n/COMPANY_NAME p/PHONE_NUMBER e/EMAIL a/ADDRESS [t/INDUSTRY]...,COMPANY_NAME,PHONE_NUMBER,EMAIL,ADDRESS,INDUSTRY, an example of how to fill up the parameters areadd com n/Google p/65218000 e/GoogleHire@gmail.com a/70 Pasir Panjang Rd, #03-71 t/Cloud Computing t/Artificial Industry. -
Items in square brackets
[]are optional. These parameters are optional because they are additional information and you can key them in at a later date if you do not have the relevant information at hand.
e.gadd int INDEX j/JOB_TITLE [w/WAGE] [p/PERIOD] [r/REQUIREMENT]...can be used as
add int 1 j/Software Engineeroradd int 3 j/Web Developer r/React w/3000 r/HTML5. -
Items with
... after them can be used multiple times including zero times.
e.g.[r/REQUIREMENT]...can be used asr/Rust,r/React native r/JavaScriptetc. -
Parameters can be in any order.
e.g. if the command specifiese/EMAIL a/ADDRESS,a/ADDRESS e/EMAILis also acceptable. Note that the command word and the item type should still come first. -
INDEXrefers to the index of the item (Company, Internship, Application, or Profile Item) in its respective displayed list of items unless stated otherwise. AllINDEXes are positive integers (1, 2, 3, …).
Features
Navigating InternHunter
InternHunter screen consists of 3 tabs. Mainly the company, application and profile tab. Each tab will display information of its own data type.
Switching tabs: switch
Switches between tabs.
Format: switch TYPE
There are three TYPEs:
comappme
com refers to Company tab, app refers to Application tab, me refers to Profile tab.
Example:
- Suppose you want to switch tabs to the application tab. Executing
switch appwill switch the tabs to application tab.

2. Note that the tabs have been changed as well as the cards and display.

Company
This represents a company, any company, but typically one you are interested in applying for an internship to. You can record and maintain a company’s name, phone number, email address, physical address, and its industry types. You can then specify what internships the company is offering by using the internship commands.
Command execution
Note that all Company commands follow the following general 2-step process:
Step 1: Enter the command into the command box. An example command is given in the image below.
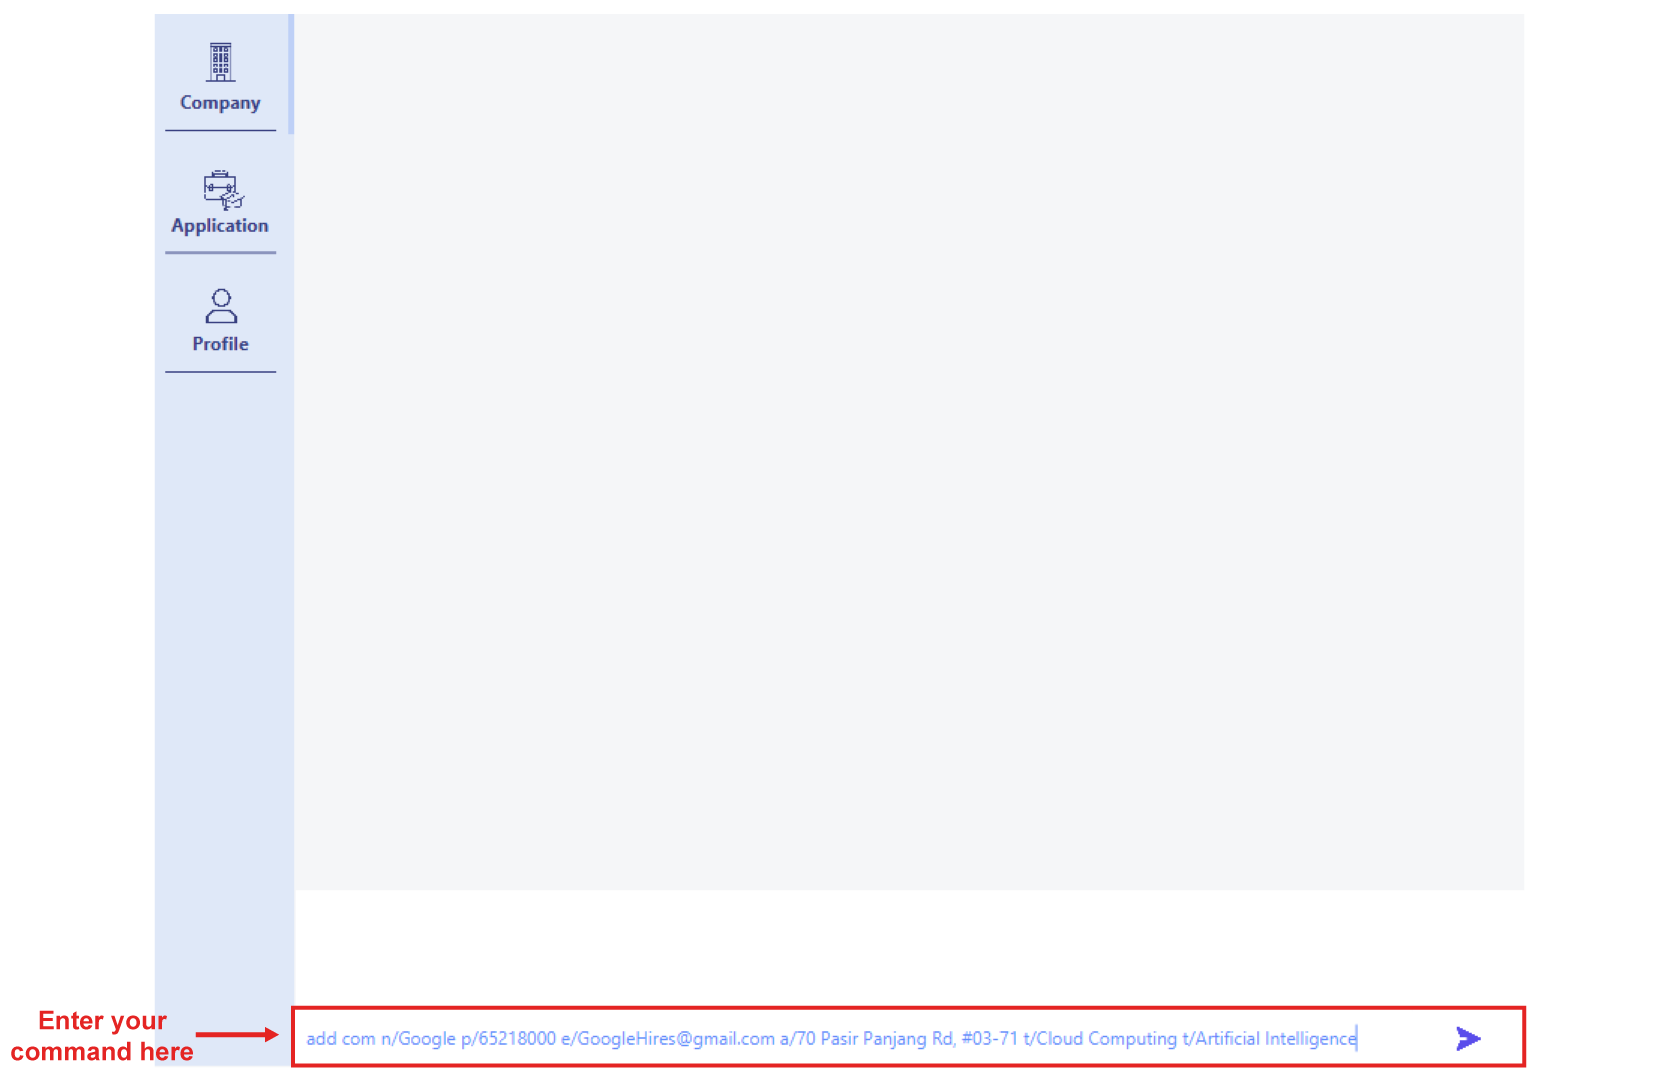
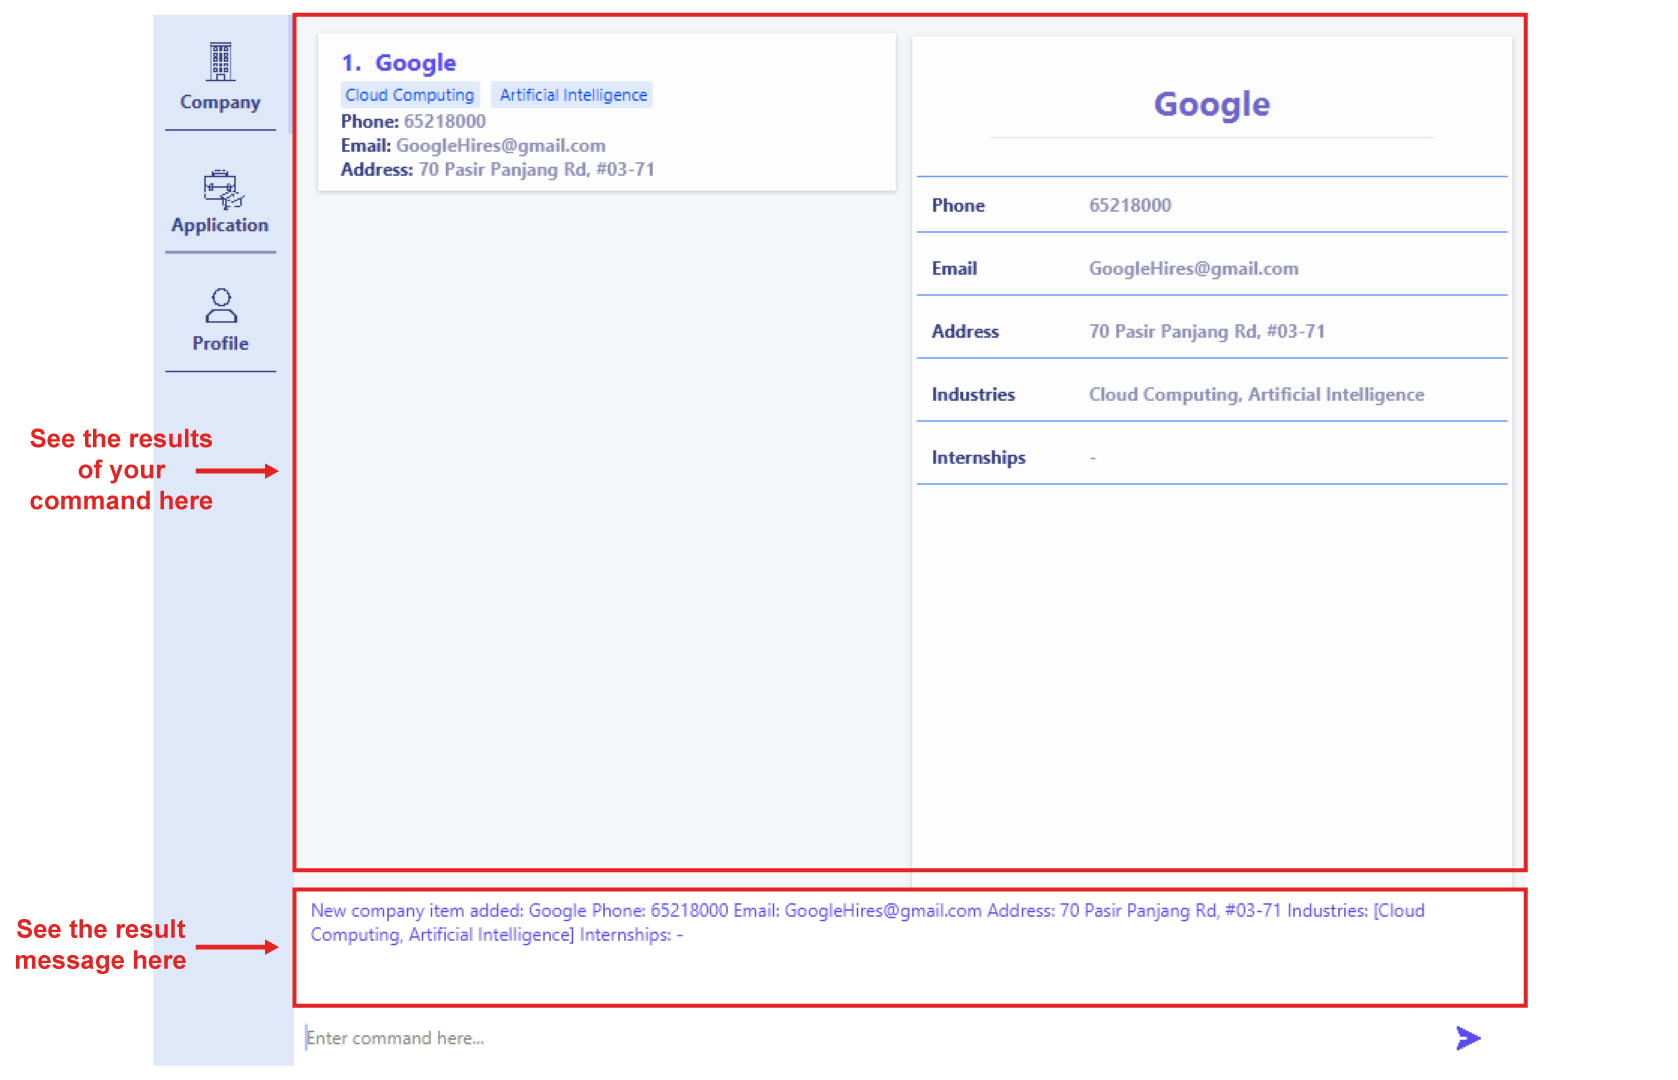
Step 2: Press ‘Enter’ on your keyboard to execute the command. Upon successful execution, you will see the results of your command reflected immediately in the app. An appropriate result message will also be displayed in the result display.
![]() Note:
Note:
- You must create a company before you can create internships that the company offers.
- Company names are unique - you cannot add multiple companies with the same case-sensitive name (they will be regarded as the same company and will not be allowed to exist in the app).
n/Google Singapore and n/Google San Francisco)!
Adding a company: add com
Adds a company to your list of companies.
Format: add com n/COMPANY_NAME p/PHONE_NUMBER e/EMAIL a/ADDRESS [t/INDUSTRY]...
Examples:
-
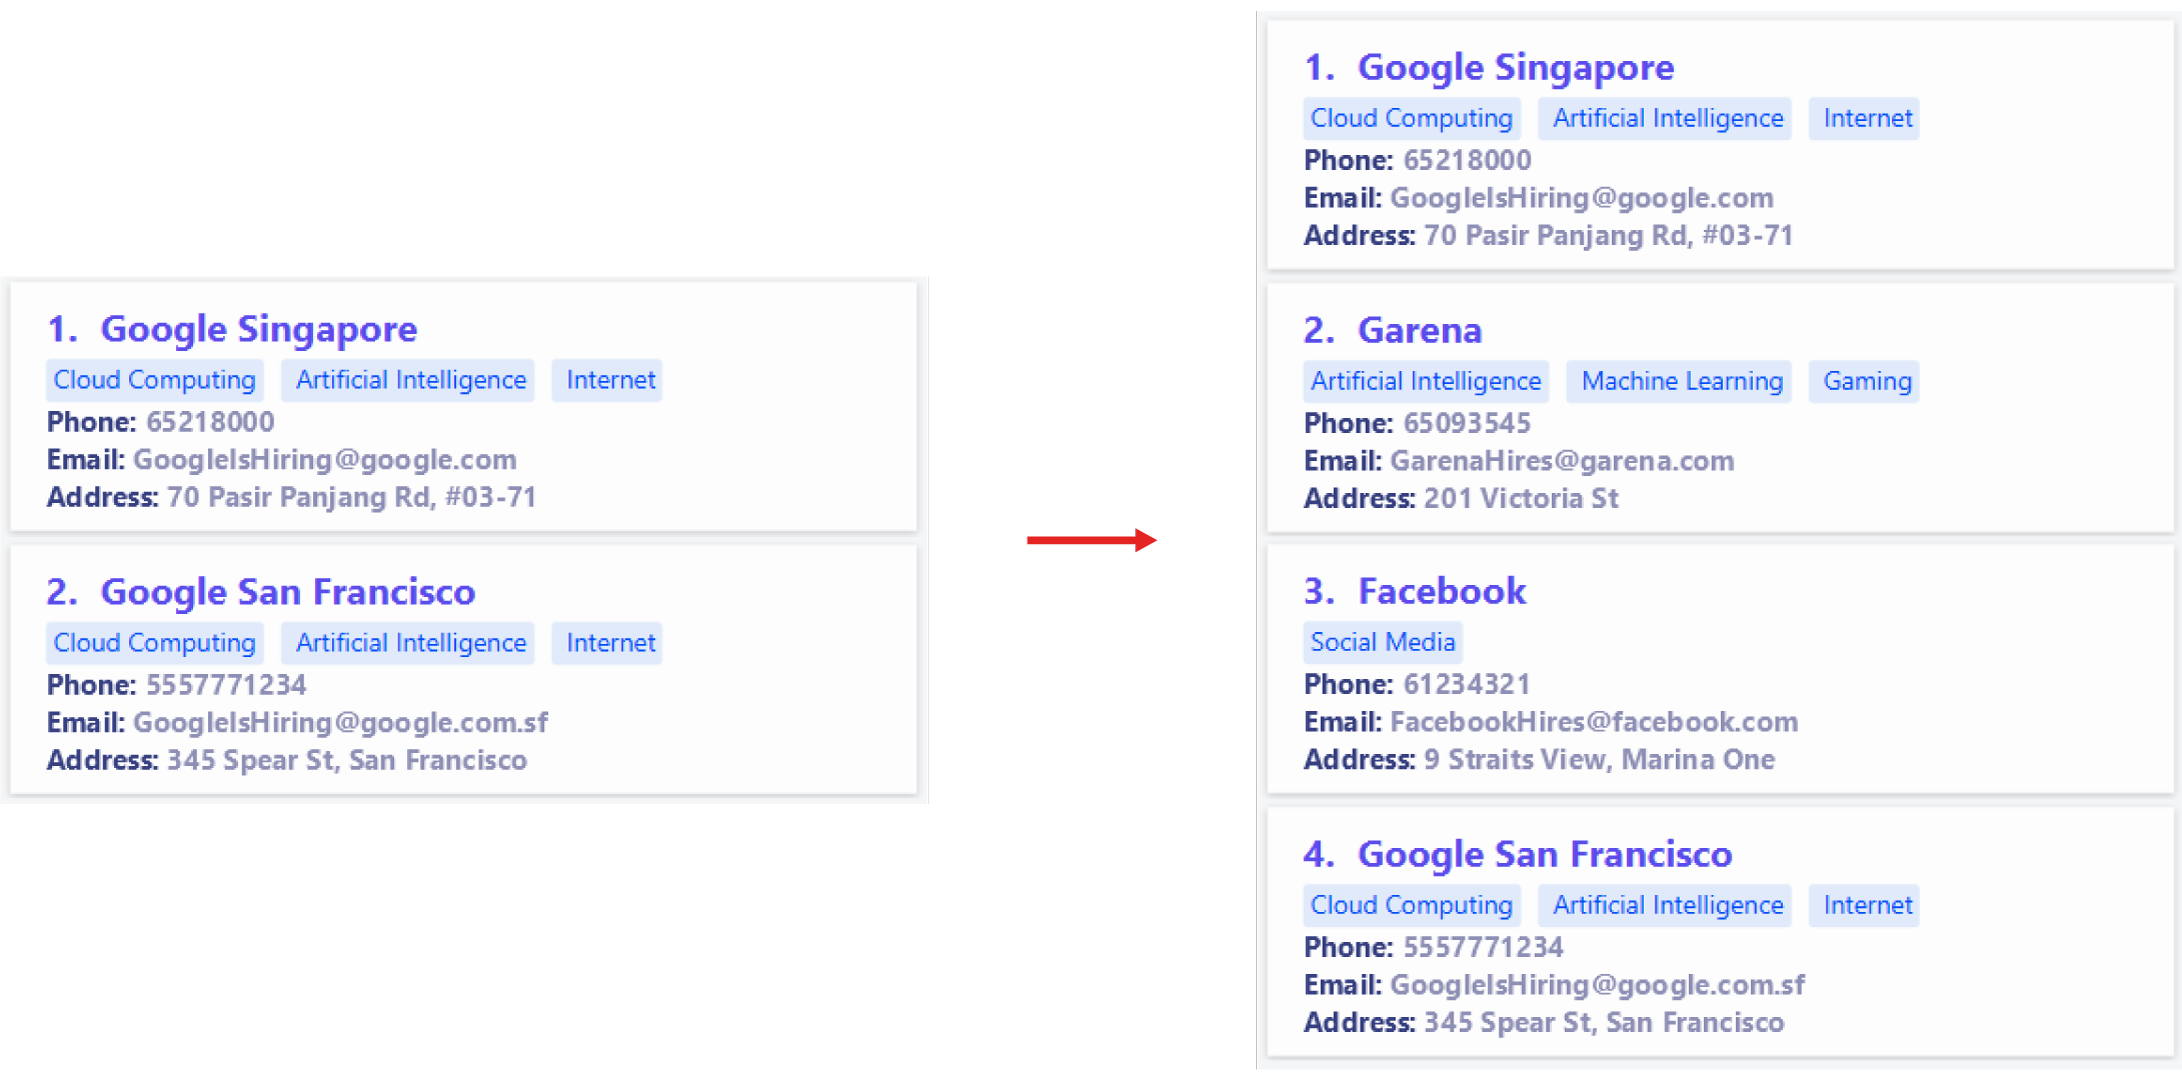
add com n/Garena a/201 Victoria St e/GarenaHires@garena.com p/65093545(notice that the company’s industry types need not be specified) - Executing
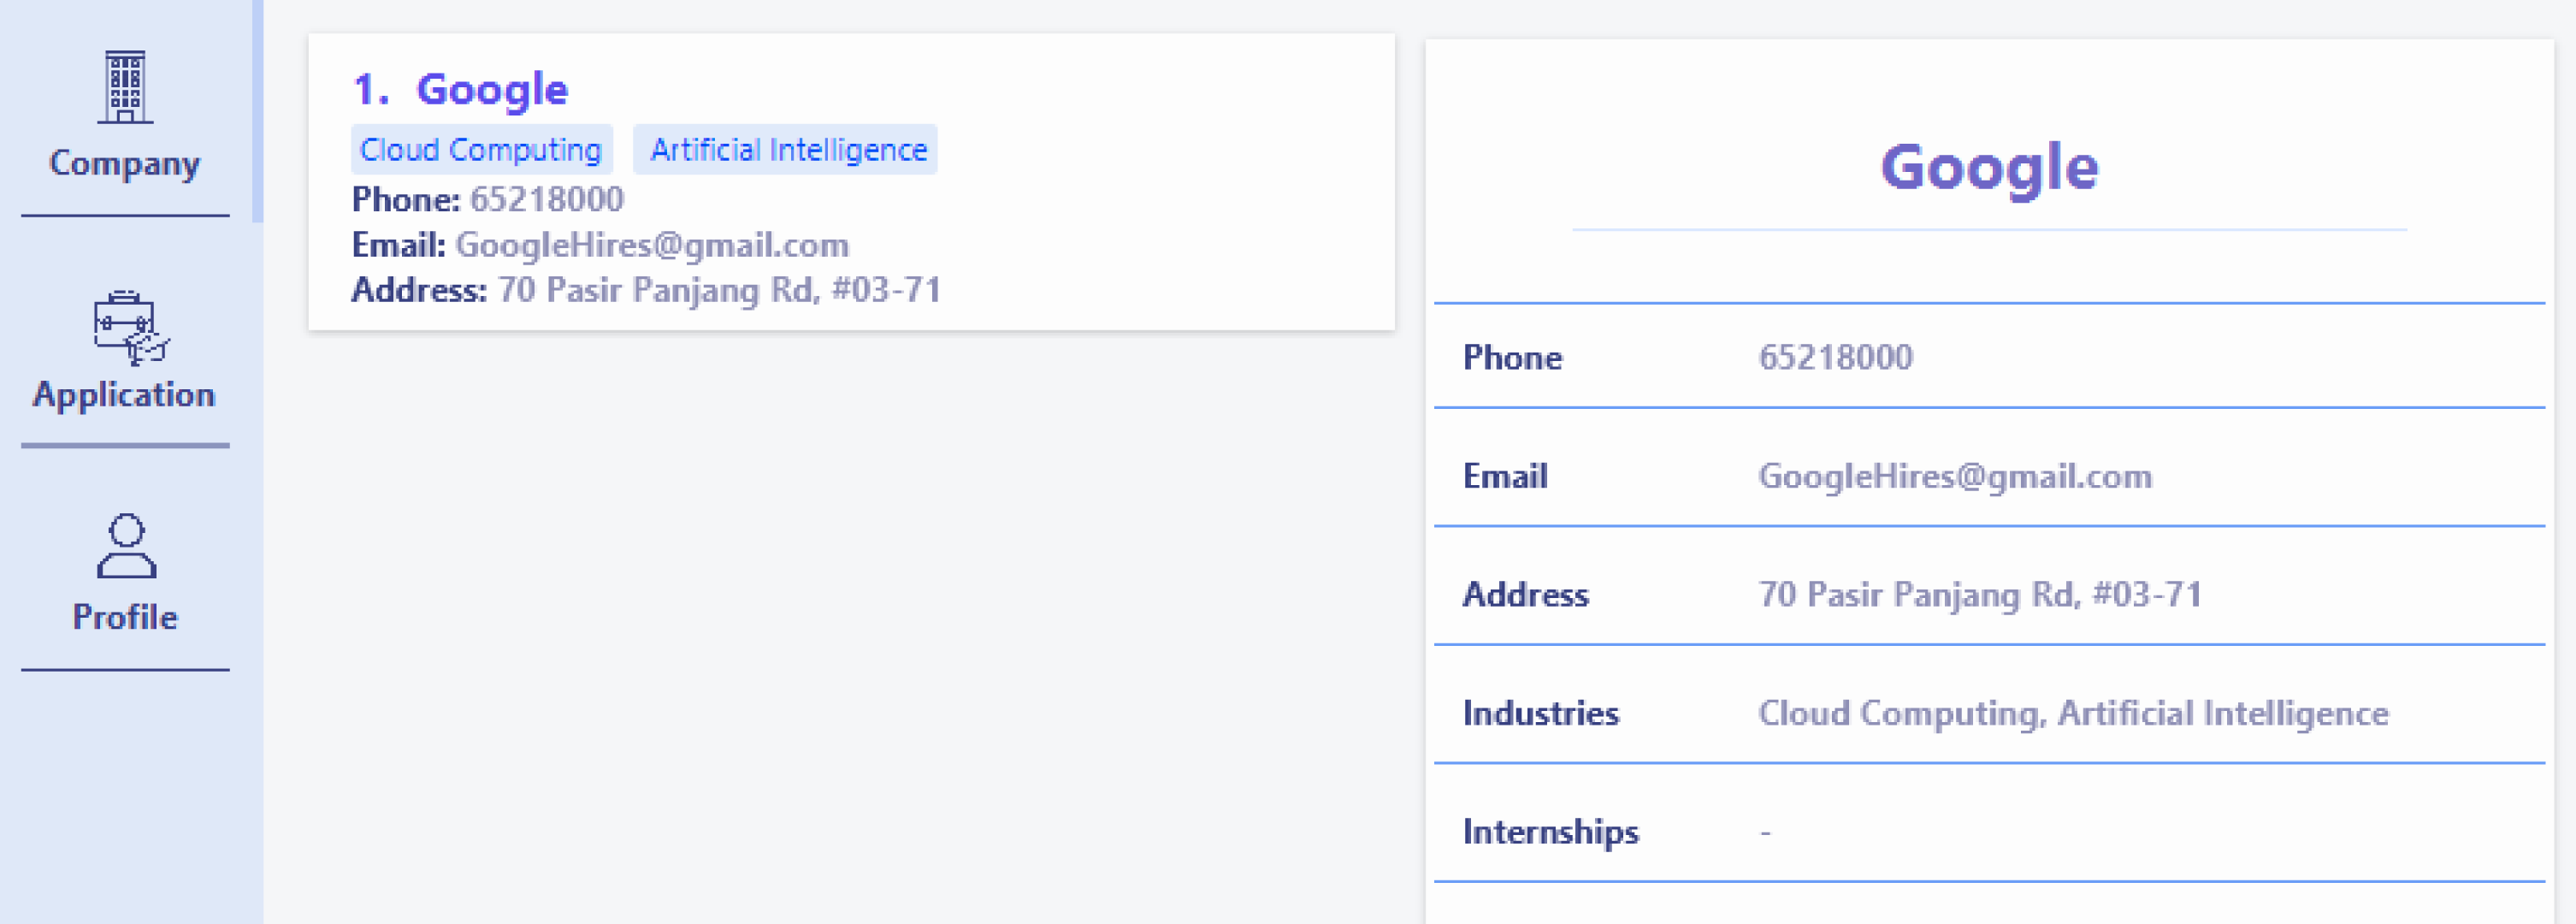
add com n/Google p/65218000 e/GoogleHires@gmail.com a/70 Pasir Panjang Rd, #03-71 t/Cloud Computing t/Artificial Intelligenceon an empty company list will add the company as follows:
Deleting a company: delete com
Deletes a company from your list of companies. All internships and applications associated with this company will also be deleted.
Format: delete com INDEX
Example:
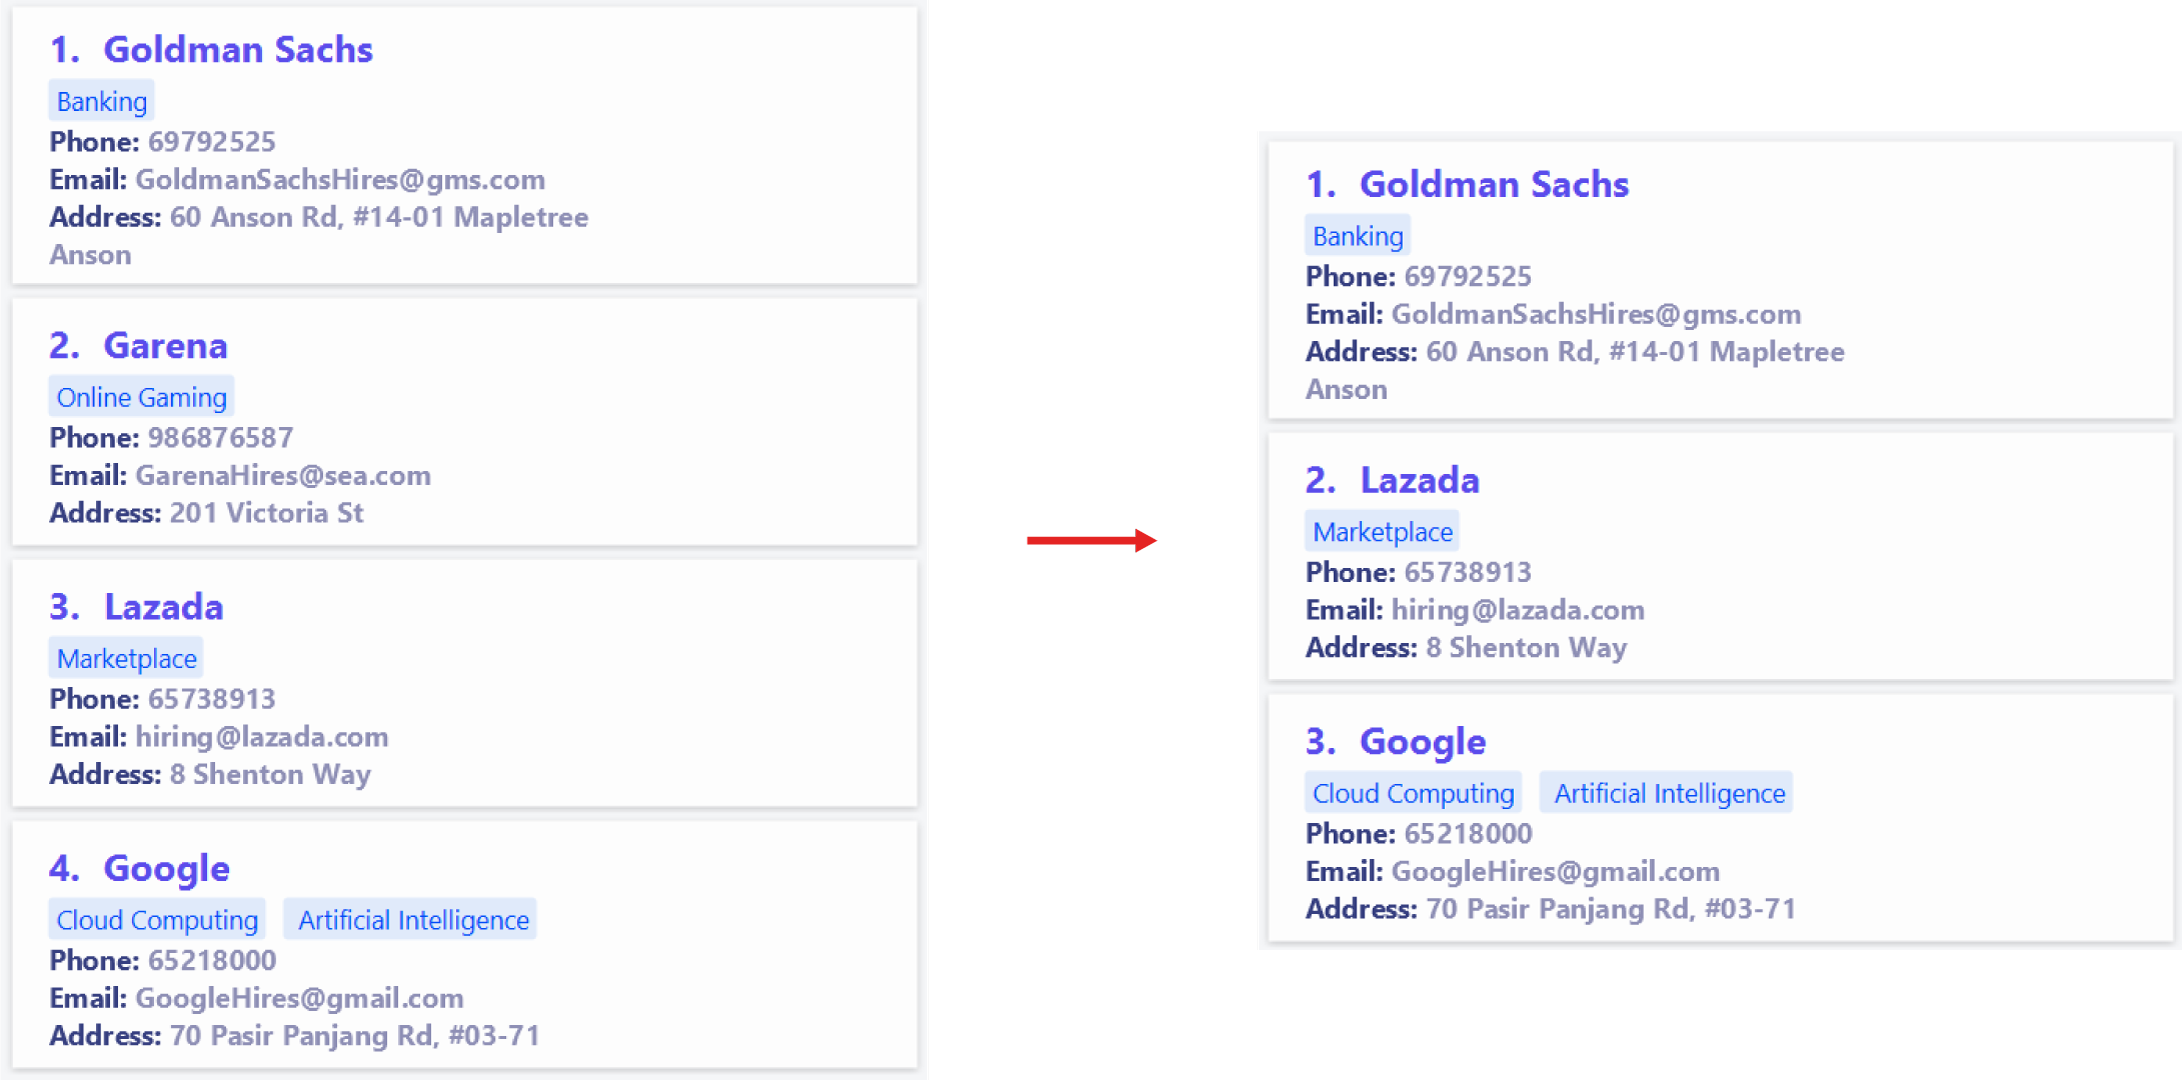
delete com 5- Executing
delete com 2on the following list will delete the 2nd company as follows:
Editing a company’s particulars: edit com
Edits a company in your list of companies.
Format: edit com INDEX [n/COMPANY_NAME] [p/PHONE_NUMBER] [e/EMAIL] [a/ADDRESS] [t/INDUSTRY]...
- At least one of the optional fields must be provided.
- Existing values will be updated to the input values.
- When editing industry types, the existing industry types get removed i.e. industry types do not accumulate.
- You can remove all of a company’s industry types by simply typing
t/without specifying anything after it.
Examples:
edit com 2 p/61234567- For the following example, executing
edit com 1 n/Google Singapore e/GoogleIsHiring@google.com t/Internetwill edit company 1 as follows:
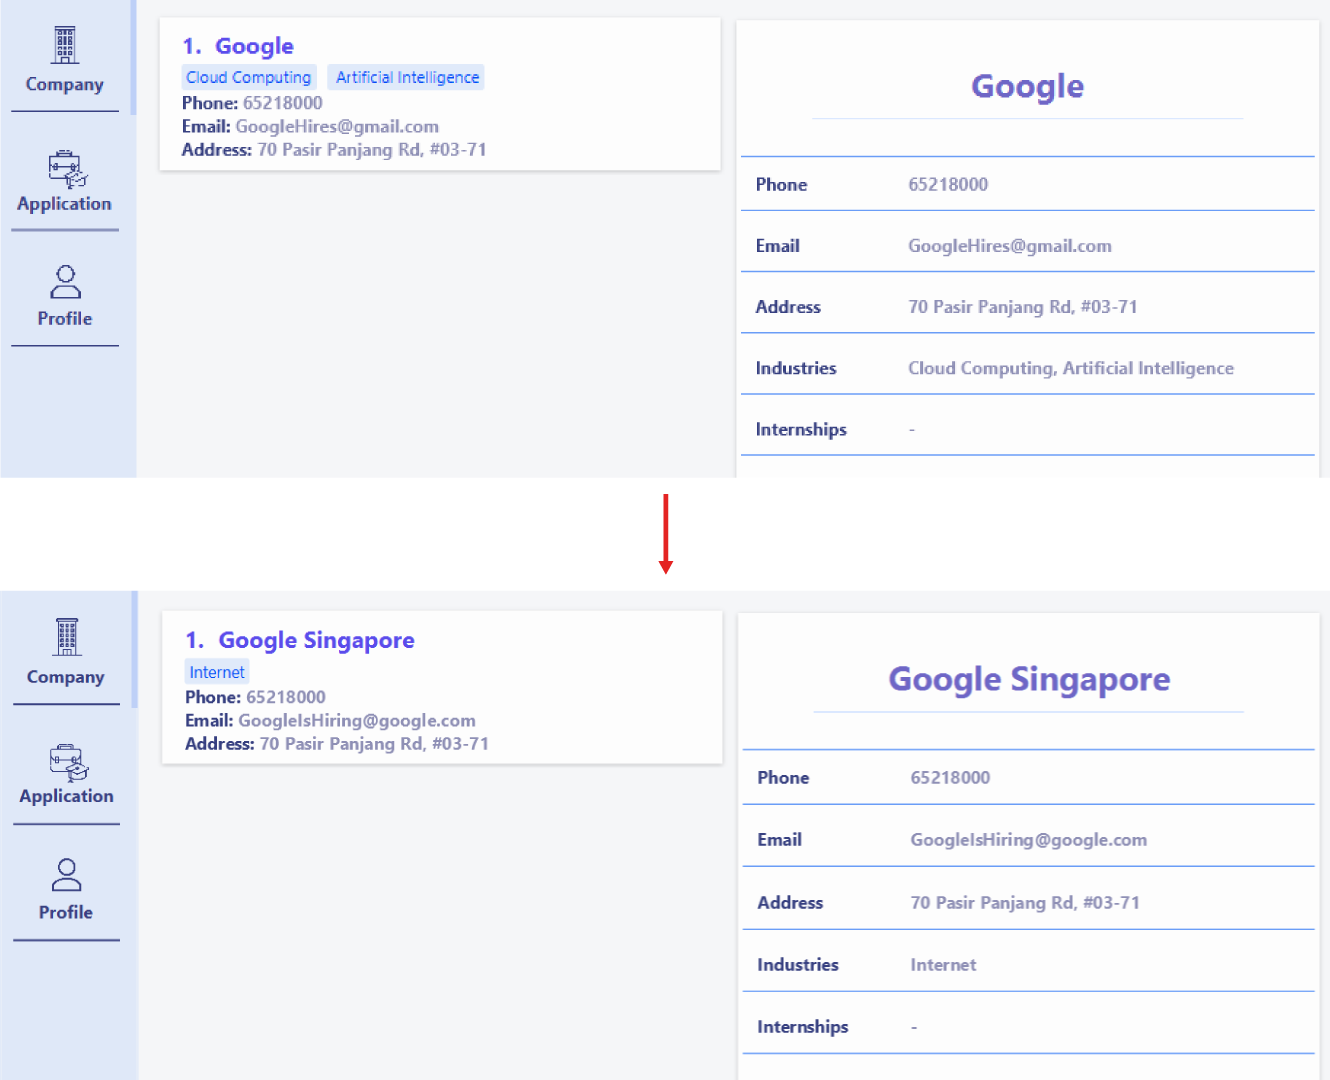
(Notice that by editing industry types, the existing industry types get replaced i.e. industry types do not accumulate)
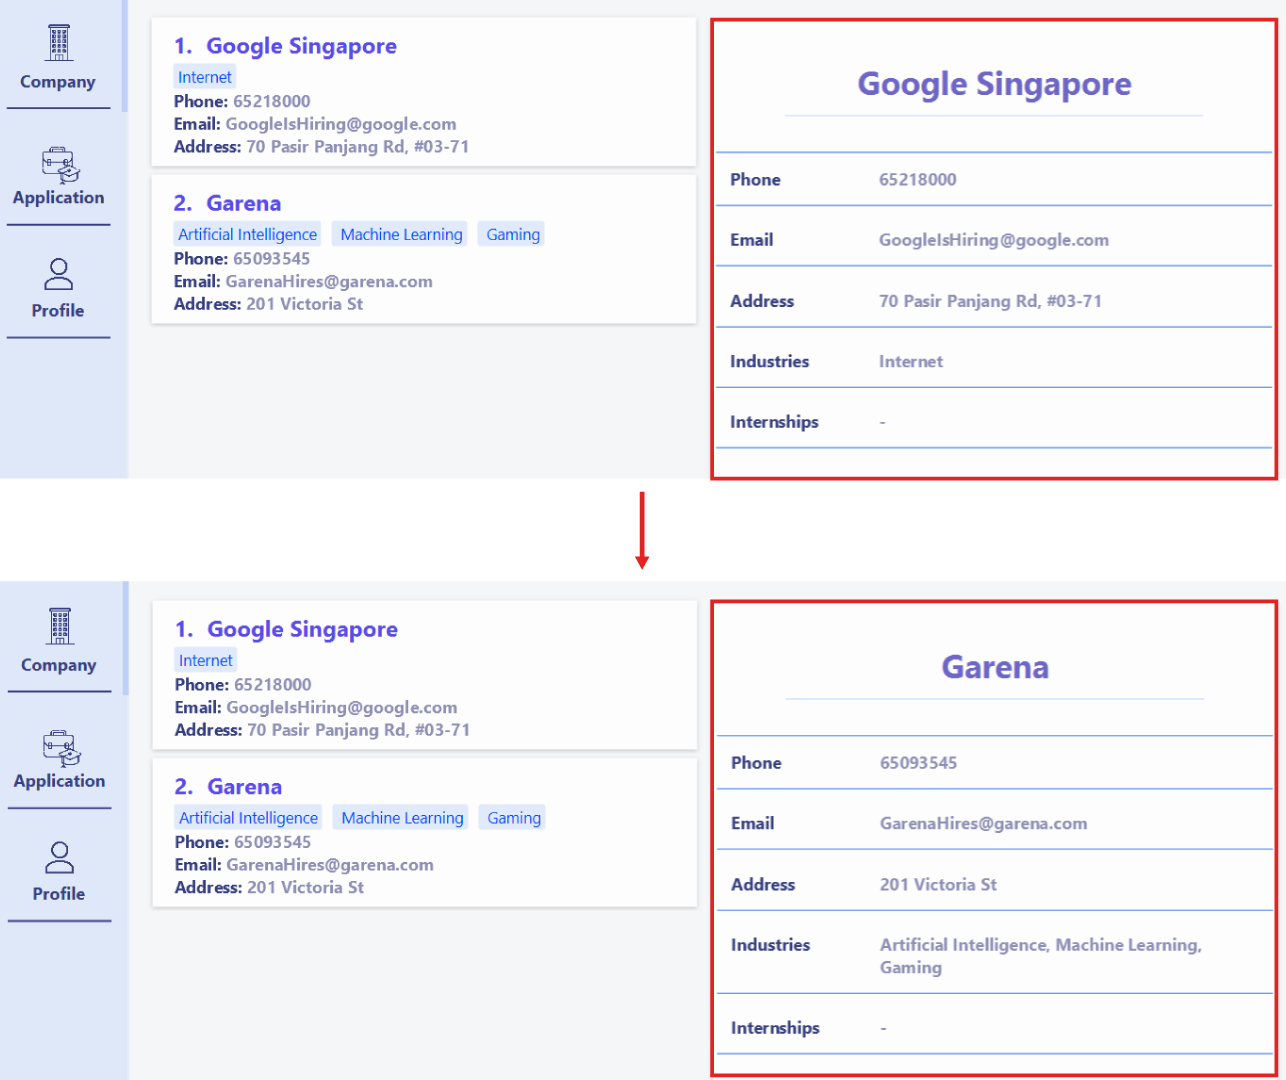
Viewing a company’s particulars in full: view com
Selects a company in your list of companies to show in detail on the right panel.
Format: view com INDEX
Examples:
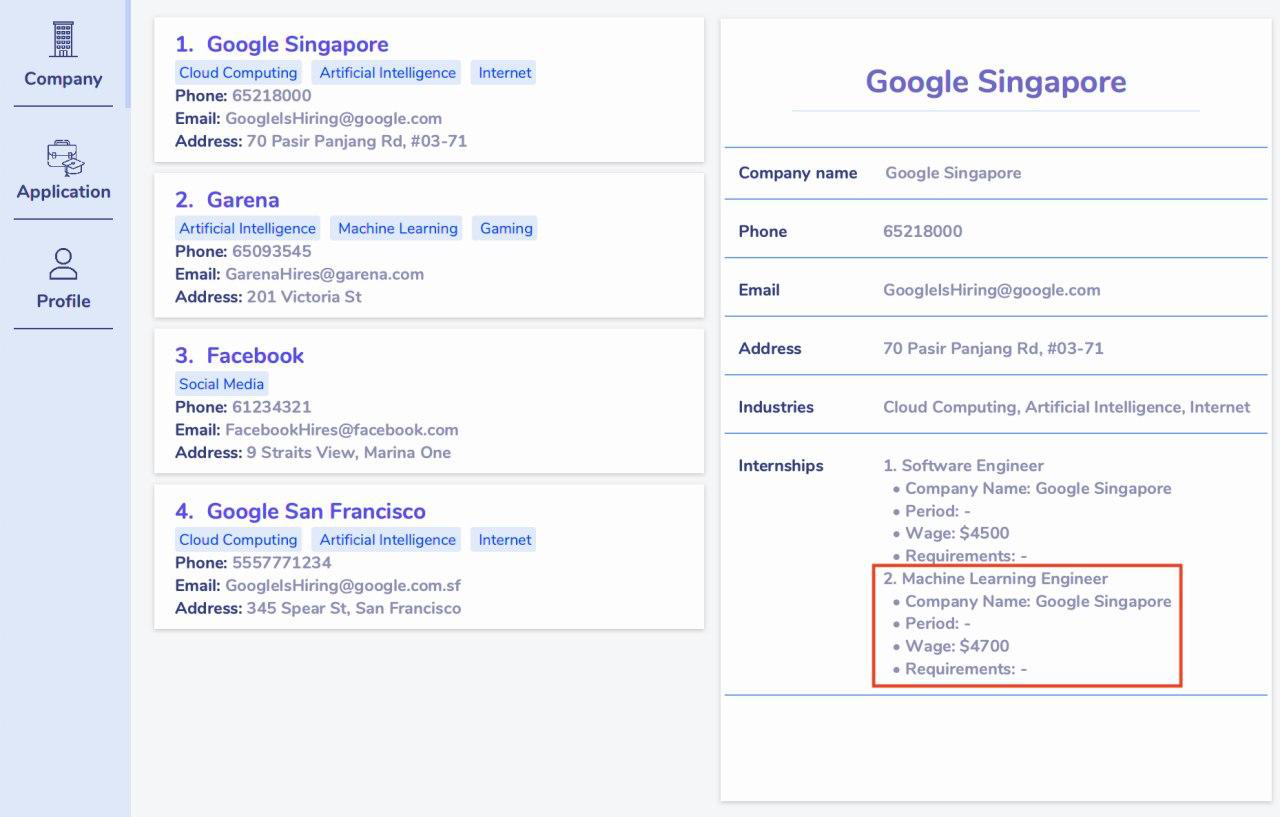
view com 3- Suppose you are currently viewing the first company and you want to view the second company. Executing
view com 2will update the right panel to display the second company:
Finding companies: find com
Finds all companies in your list of companies whose names contain any of the given keywords.
Format: find com KEYWORD [ANOTHER_KEYWORD]...
- Only the company name will be searched for.
- The search is case-insensitive. e.g.
googlewill matchGoogle. - Companies with names matching at least one keyword will be returned. e.g.
Google Facebookwill return companies whose names contain the wordGoogleorFacebook. - The order of the keywords does not matter. e.g.
Google FacebookandFacebook Googlewill return the same results. - Only full words will be matched. e.g.
Googlwill not matchGoogle.
![]() Note:
Note:
Upon successful execution of this command, your company list will be updated to only show matching results. All
subsequent delete, edit and view company commands will use indexing based on this updated list. Switching tabs will
not return the list to its full state. If you wish to return to seeing all the companies in your list,
execute list com.
Examples:
find com Amazon-
Suppose you have this list of companies. Executing
find com googlewill update the list to show matching companies:
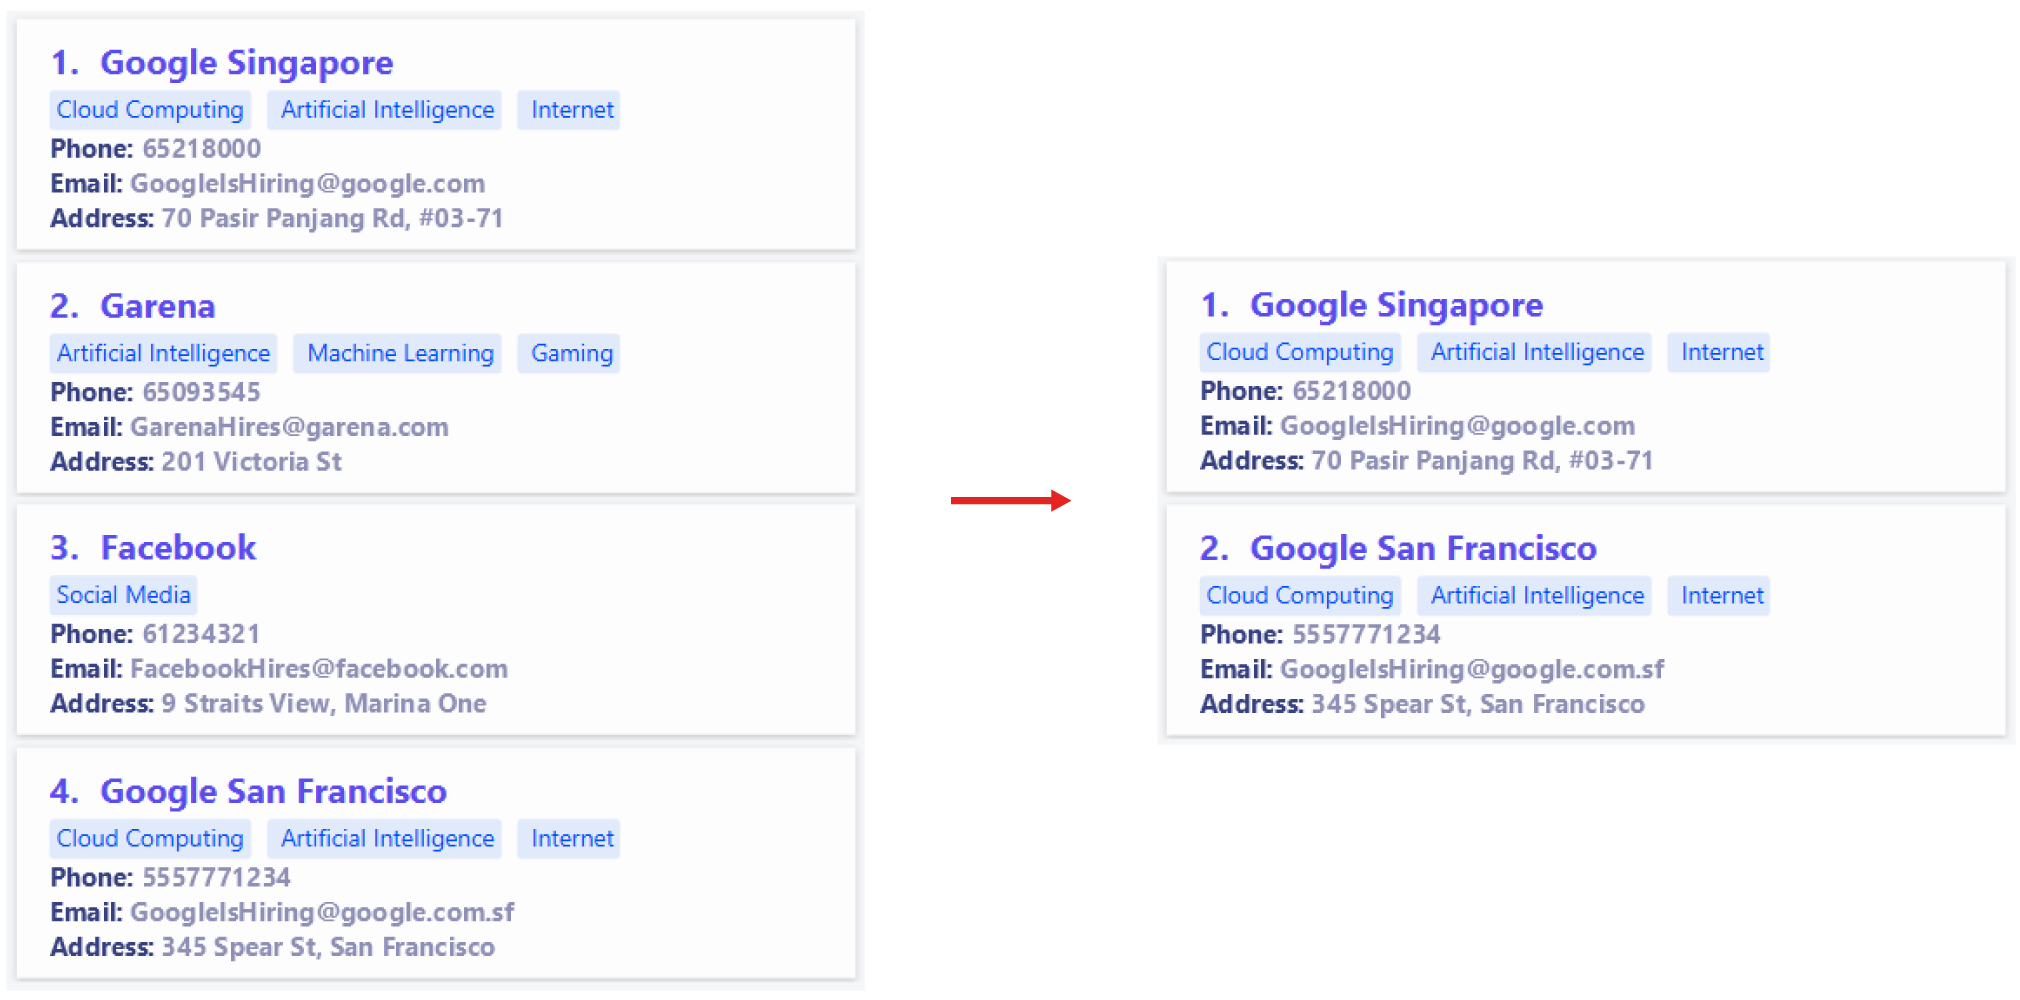
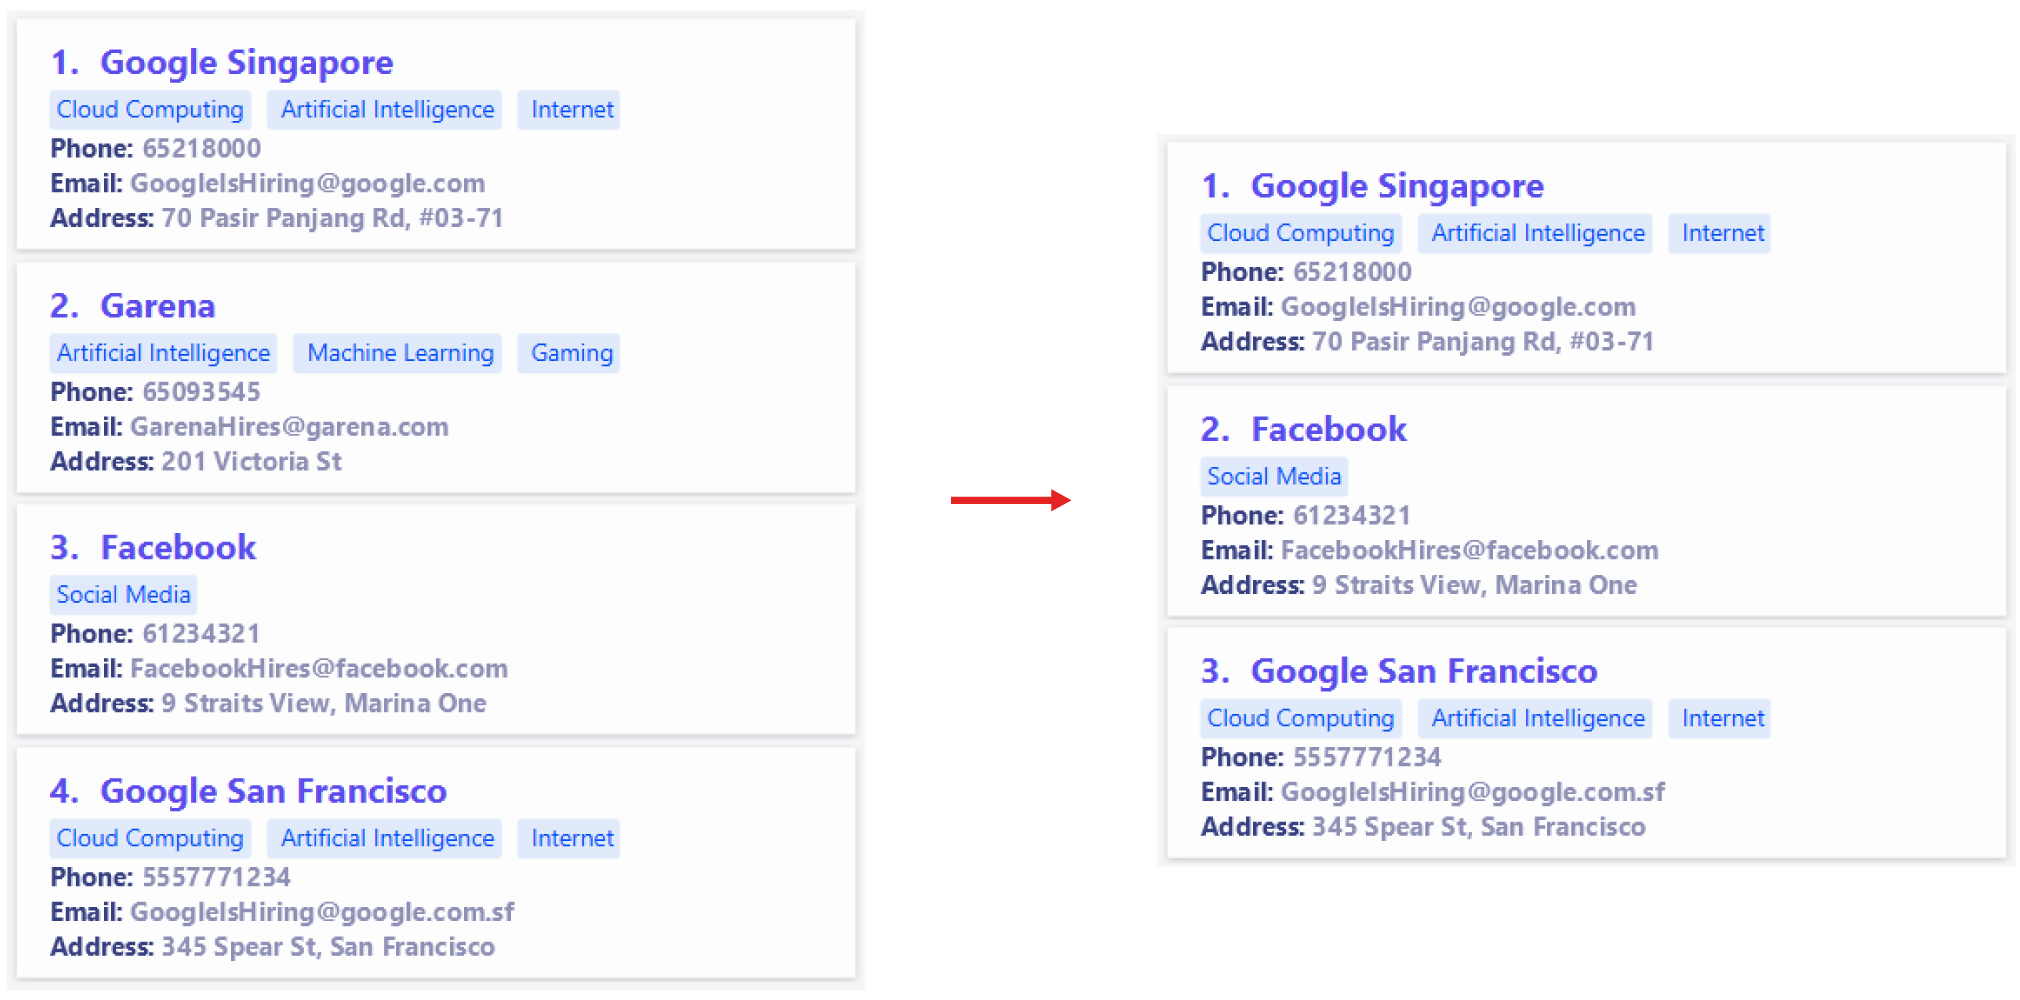
And executing
find com google facebookwill return the following:
Listing all companies: list com
Lists out all companies in your list of companies. After using the find com command, you would have likely
narrowed your list of companies down to a few search results. Use the list com command to revert to seeing all the
companies in your list.
Format: list com
Example:
- If you have 4 companies in total in your company list, and your list is currently only showing 2 companies after
having executed a
find comcommand, to view all the companies in your list, executelist com:
Internship
Adding an internship to a company: add int
Adds an internship to a company.
Format: add int INDEX j/JOB_TITLE [w/WAGE] [p/PERIOD] [r/REQUIREMENT]...
-
INDEXrefers to the index of the company in the company list. -
PERIODcan refer to any word (e.g.3 months,Summer break,Jun - Aug 2021). -
WAGEmust be a positive integer (without leading zeroes or + symbol).
Examples:
add int 3 j/Web Developer w/3000 p/30 May to 30 Aug r/React r/HTML5add int 1 j/Machine Learning Engineer w/4700
Deleting an internship from a company: delete int
Deletes an internship from a company. The application (if any) made with this internship will also be deleted.
Format: delete int INDEX i/INDEX
-
INDEXrefers to the index of the company in the company list, andi/INDEXrefers to the index of the internship in the company’s list of internships.
Example:
delete int 3 i/2
Modifying an internship’s details: edit int
Edits an internship from a company. The application (if any) made with this internship will also be edited.
Format: edit int INDEX i/INDEX [j/JOB_TITLE] [w/WAGE] [p/PERIOD] [r/REQUIREMENT]...
-
INDEXrefers to the index of the company in the company list, andi/INDEXrefers to the index of the internship in the company’s list of internships. - At least one of the optional fields must be provided.
- Existing values will be updated to the input values.
- When editing
REQUIREMENTS, all existing requirements get replaced by the new specified requirements. - You can remove all
REQUIREMENTSby addingr/without anything after it.
Examples:
edit int 3 i/1 j/Frontend Developer- Executing
edit int 1 i/2 w/4800 r/Java r/Python:
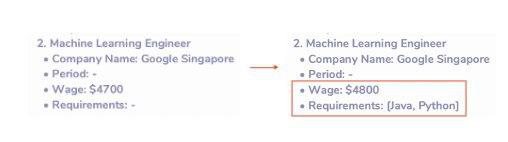
If an application is already created for the internship, it will also be edited as shown below:

Application
Now that you have learnt how to manage your companies and internships, the next burning question you probably have is how to use InternHunter to apply, track and manage your internship applications. Read on through this section to find out how.
All about applications
Each application comes with a STATUS and STATUS_DATE field which indicates the
date that the STATUS was set/updated.
Valid STATUS specifiers:
AppliedInterviewWaitingRejectedOfferedAccepted
Valid STATUS_DATE formats:
- d-M-yy HHmm
- e.g.
23-12-20 2230
- e.g.
- d-M-yy
- e.g.
23-12-20 - Time will be taken as 2359
- e.g.
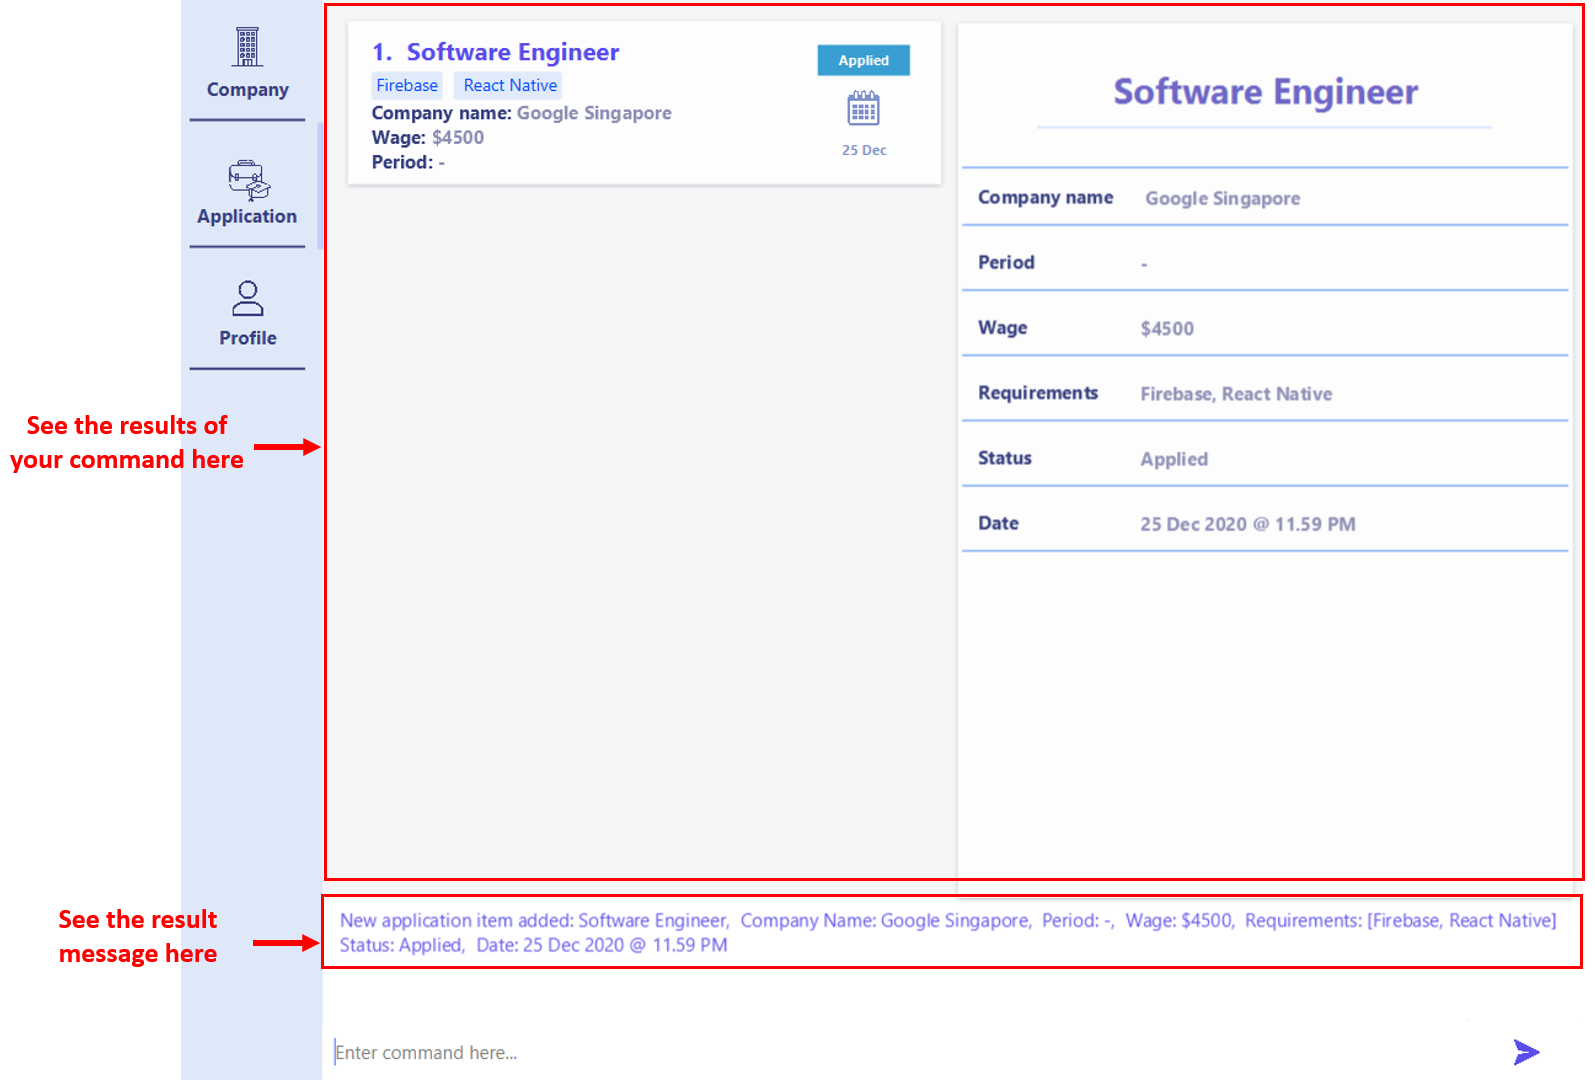
Here is how the application tab looks like:

Command execution
All application commands follow the following general 2-step process:
Step 1: Enter the command into the command box. An example command is given in the image below.
Step 2: Press ‘Enter’ on your keyboard to execute the command. Upon successful execution, you will see the results of your command reflected immediately in the app. An appropriate result message will also be displayed in the result display.
Applying for an internship: add app
Selects an internship from a company and adds it to your list of applications. If unspecified, the application’s
STATUS will be Applied, and it’s STATUS_DATE will be set as today’s date and time to be 2359.
Format: add app INDEX i/INDEX [s/STATUS] [d/STATUS_DATE]
- Where
INDEXrefers to the index of the company in the company list, andi/INDEXrefers to the index of the internship in the company’s internship list.
STATUS field can be used as freely as you want it too! Say you have applied and already
got the interview for the internship, you can immediately add the application with status Interview without needing to add
the application and update it afterwards in a 2-step process.
Example:
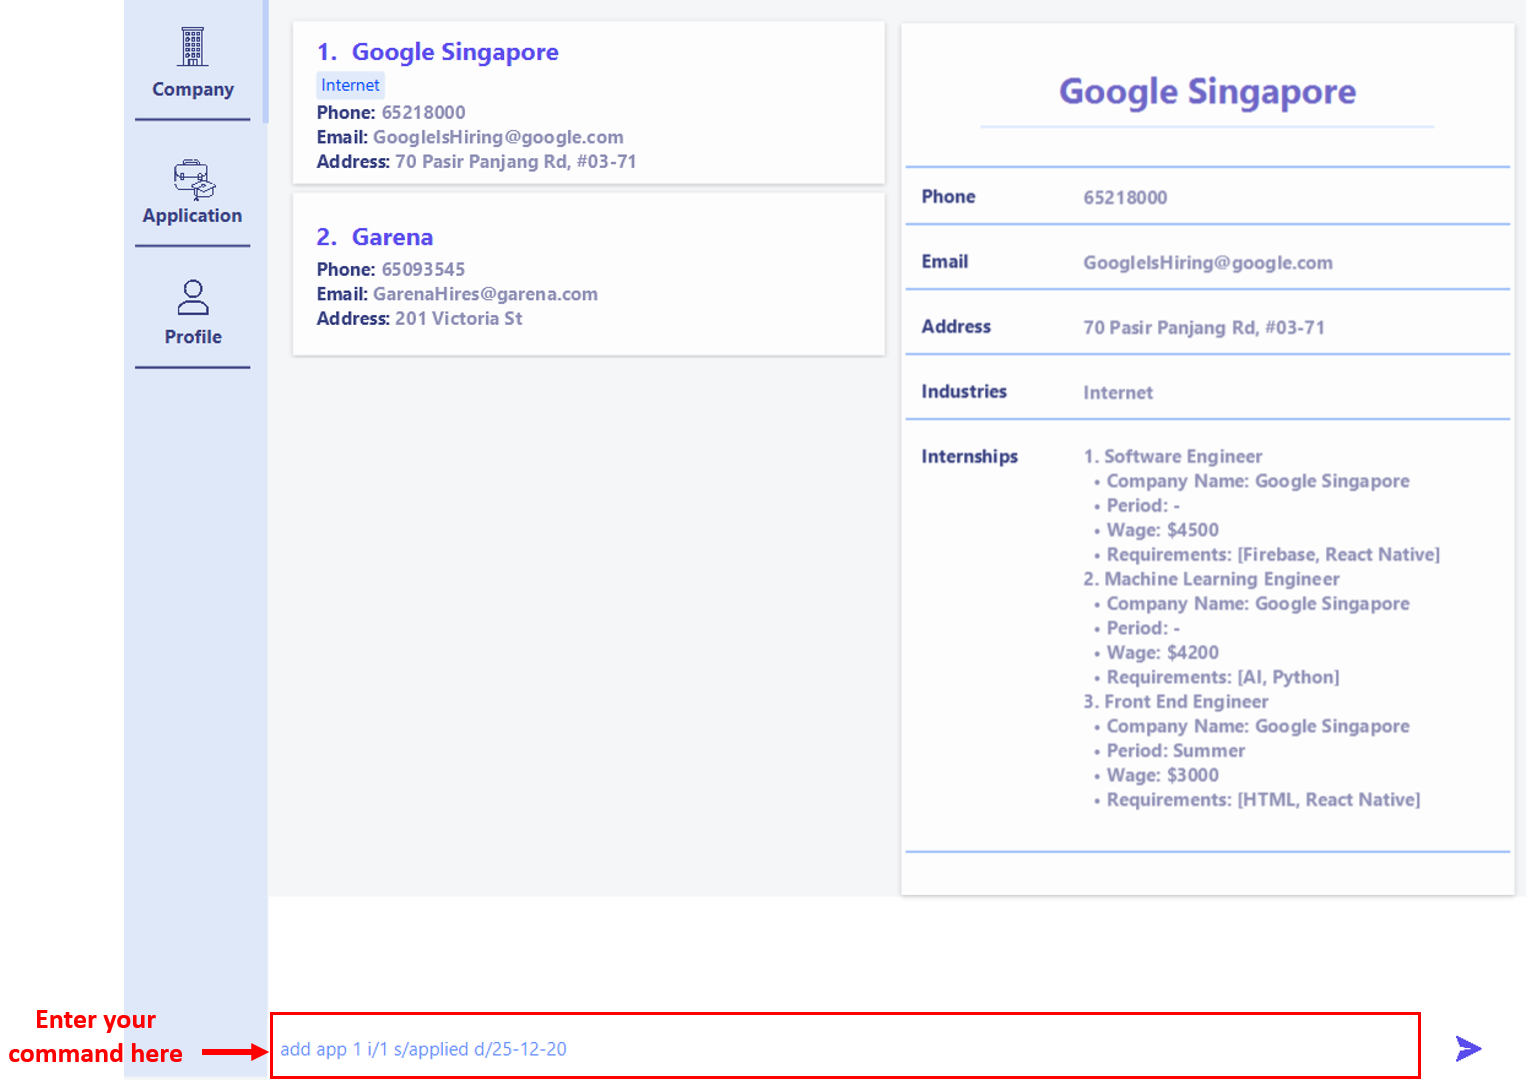
- Suppose you are interested in applying for the Software Engineer internship in Google Singapore:

Executing add app 1 i/1 d/24-12-20 will apply for the internship as follows.
Note that you will be automatically switched to the application tab to view the application made:

Deleting an application: delete app
Deletes an application from your list of applications.
Format: delete app INDEX
Example:
- Suppose you have these 2 applications in your application list and you want to delete the 2nd application in the list.
Executing
delete app 2will delete the 2nd application and update the list to show the remaining applications:

Updating an application: edit app
Updates an application in your list of applications.
Format: edit app INDEX [s/STATUS] [d/STATUS_DATE]
- At least one of the optional fields must be provided.
Example:
- Suppose Google Singapore has replied to your application for the Software Engineer internship and has called you up
for an interview on the 28 Dec 2020, 2pm. Executing
edit app 1 s/interview d/28-12-20 1400will update this application as follows:

Viewing an application’s details in full: view app
Selects an application in the list of applications to show in detail on the right panel.
Format: view app INDEX
Example:
- Suppose you are currently viewing the first application and you want to view the second application.
Executing
view app 2will update the right panel to display the second application:

Finding applications: find app
Finds all applications in your list of applications whose job titles contain any of the given keywords.
Format: find app KEYWORD [ANOTHER_KEYWORD]...
- Only the application job title will be searched for.
- The search is case-insensitive. e.g.
engineerwill matchEngineer. - Applications with job titles matching at least one keyword will be returned. e.g.
Software Engineerwill return applications whose job titles contain the wordSoftwareorEngineer. - The order of the keywords does not matter. e.g.
Software EngineerandEngineer Softwarewill return the same results. - Only full words will be matched. e.g.
Engineerwill not matchEngine.
![]() Note:
Note:
Upon successful execution of this command, your application list will be updated to only show matching results. All
subsequent delete, edit and view application commands will use indexing based on this updated list. Switching tabs will
not return the list to its full state. If you wish to return to seeing all the applications in your list,
execute list app.
Example:
- Suppose you have this list of applications. Executing
find app engineerwill update the list to show matching applications:

Listing all applications: list app
Lists out all applications in your list of applications. After using the find app command, you would have likely
narrowed your list of applications down to a few search results. Use the list app command to revert to seeing
all the applications in your list.
Format: list app
Example:
- Following the result of
find app engineeron the application list from the example shown in the find application command, execution oflist appwill update the list to show all 4 applications in your list of applications:

Profile
The profile feature offers you the ability to keep track and maintain your personal portfolio. It stores profile items which are entities that describe an achievement, a past experience or a skill you have acquired. It assists you in crafting a tailored resume for your internship applications by allowing you to find items in your profile which are relevant to the job description through the find feature.
Each profile item belongs to 1 of 3 categories.
Valid CATEGORY specifiers:
achievementexperienceskill
Each category is represented by the following icons in the UI:
| CATEGORY | ICON |
|---|---|
achievement |
 |
experience |
 |
skill |
 |
Each profile item also contains a TITLE that describes the item, and you can optionally
add additional DESCRIPTORs to further describe the item in point form.
Here is how the profile tab looks like:

Command execution
Note that all Profile commands follow the following general 2-step process:
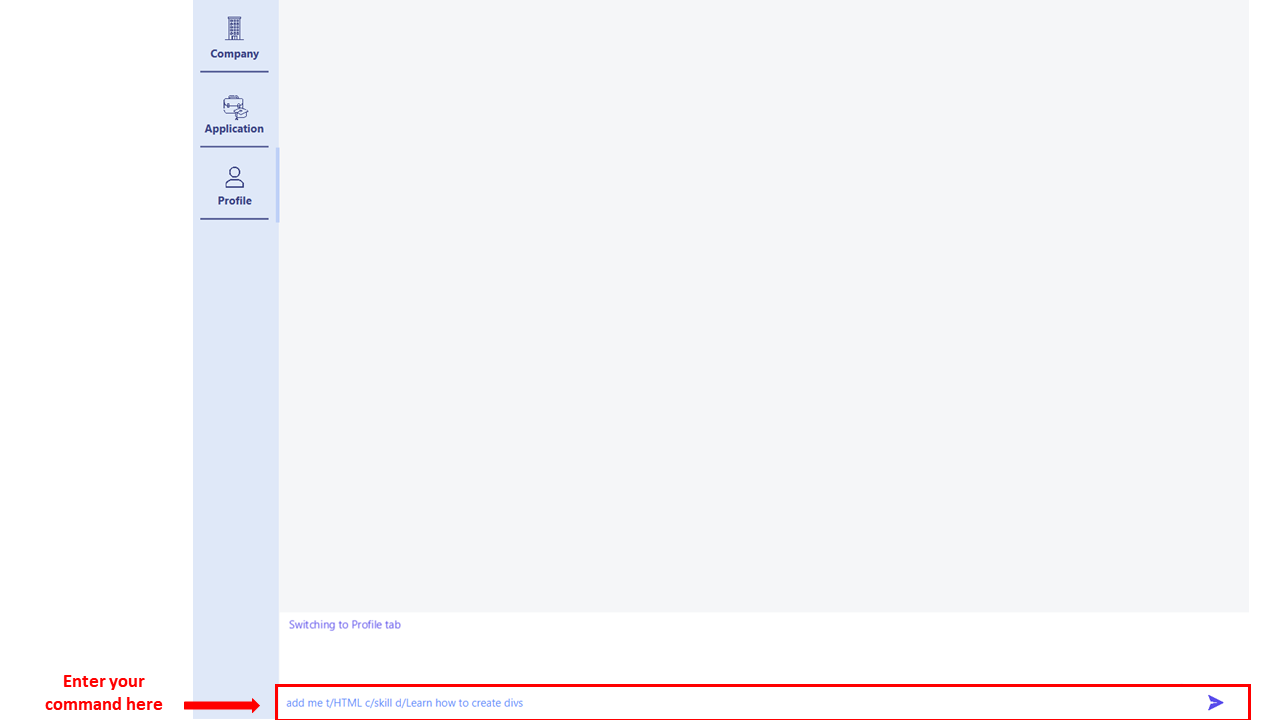
Step 1: Enter the command into the command box. An example command is given in the image below.
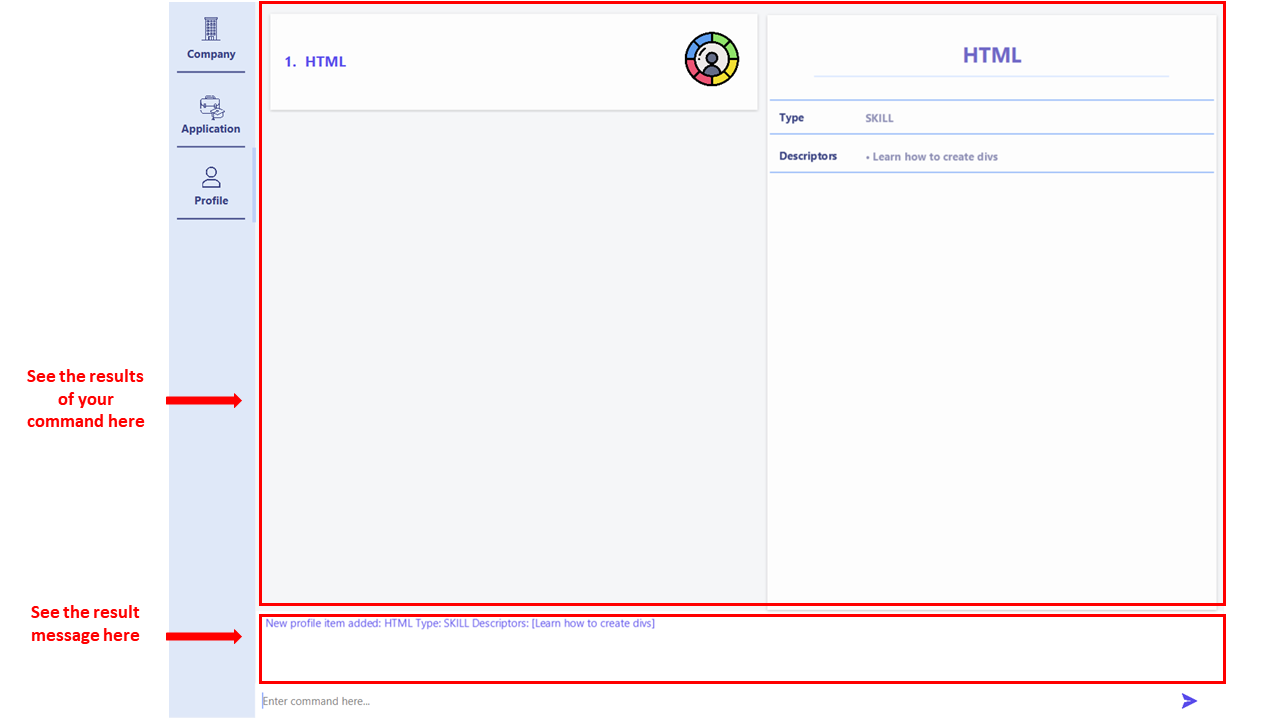
Step 2: Press ‘Enter’ on your keyboard to execute the command. Upon successful execution, you will see the results of your command reflected immediately in the app. An appropriate result message will also be displayed in the result display.
t/Participated in Open Hack 2020
and t/Participated in Open Hack 2019)!
Adding an item to your profile: add me
Adds a profile item to your profile.
Format: add me t/TITLE c/CATEGORY [d/DESCRIPTOR]...
Examples:
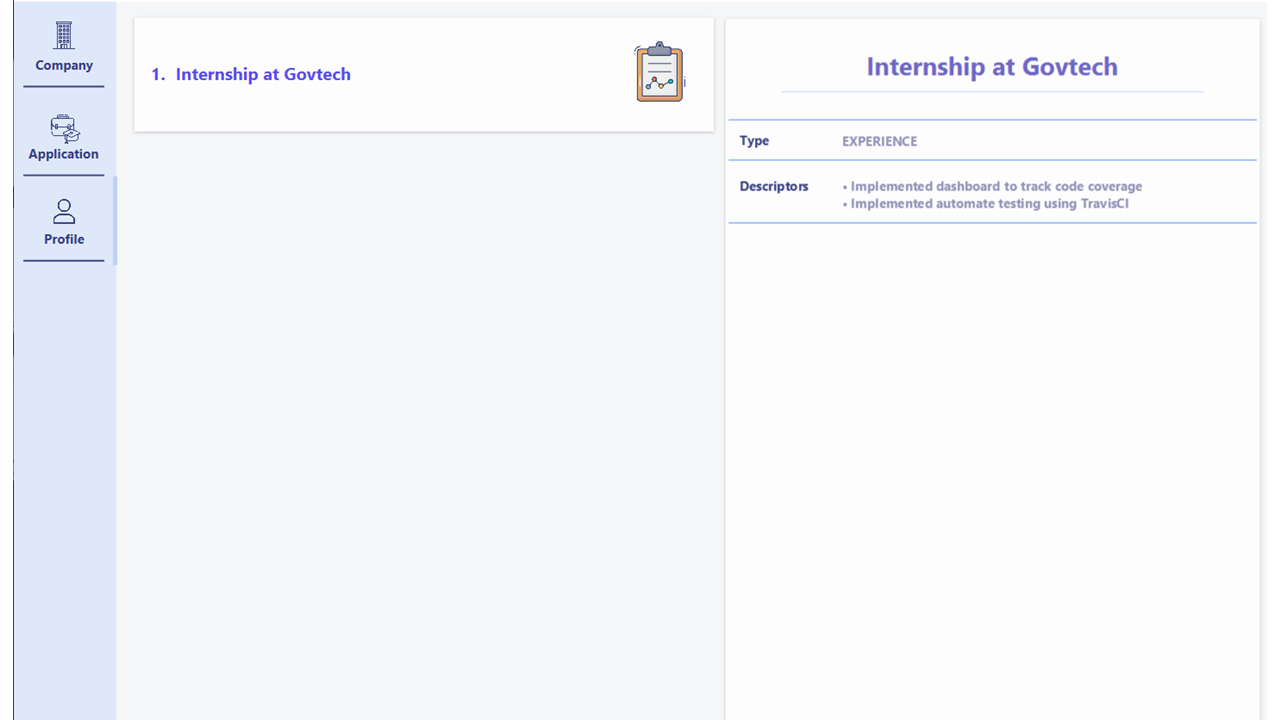
add me t/HTML c/skill d/Learn how to create divsadd me t/special recognition in Hack n Roll c/achievement- For example, you have just completed an internship at Govtech. Executing
add me t/Internship at Govtech
 c/experience d/Implemented automate testing using TravisCI d/Implemented dashboard to track code coverage
on an empty profile will add the profile item as follows:
Deleting an item from your profile: delete me
Deletes experience, skills or achievements from your profile.
Format: delete me INDEX
Example:
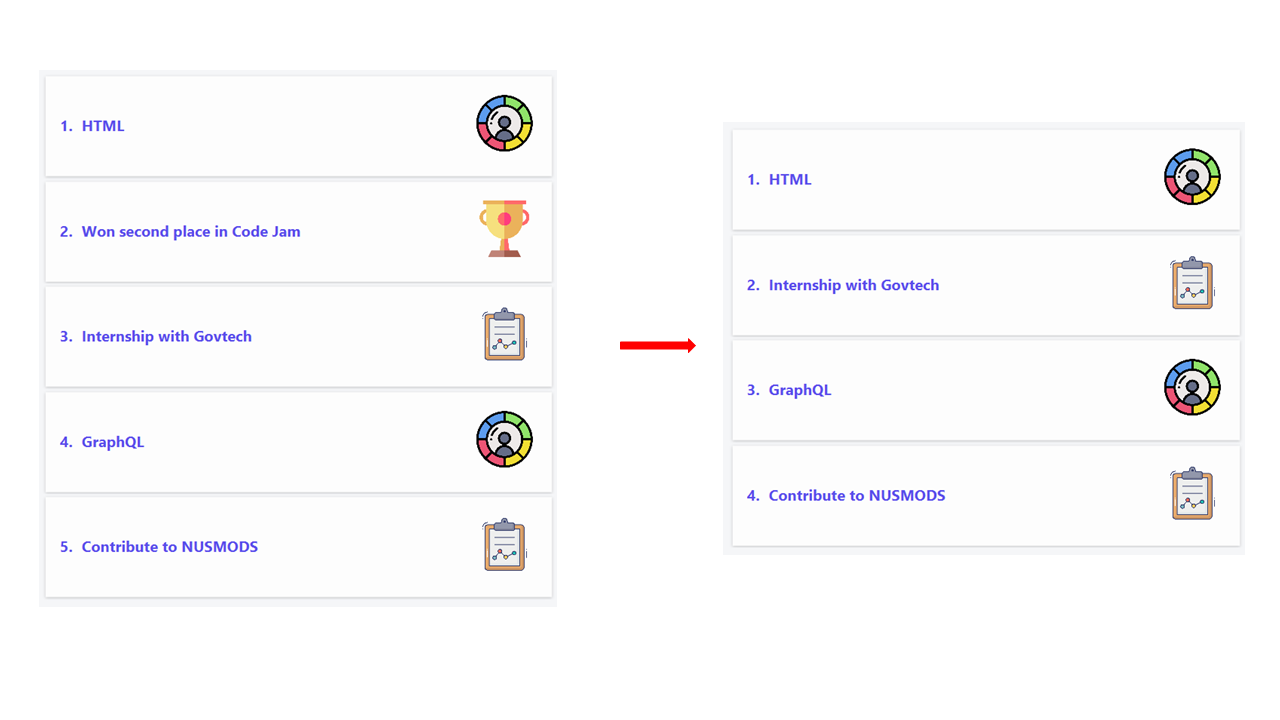
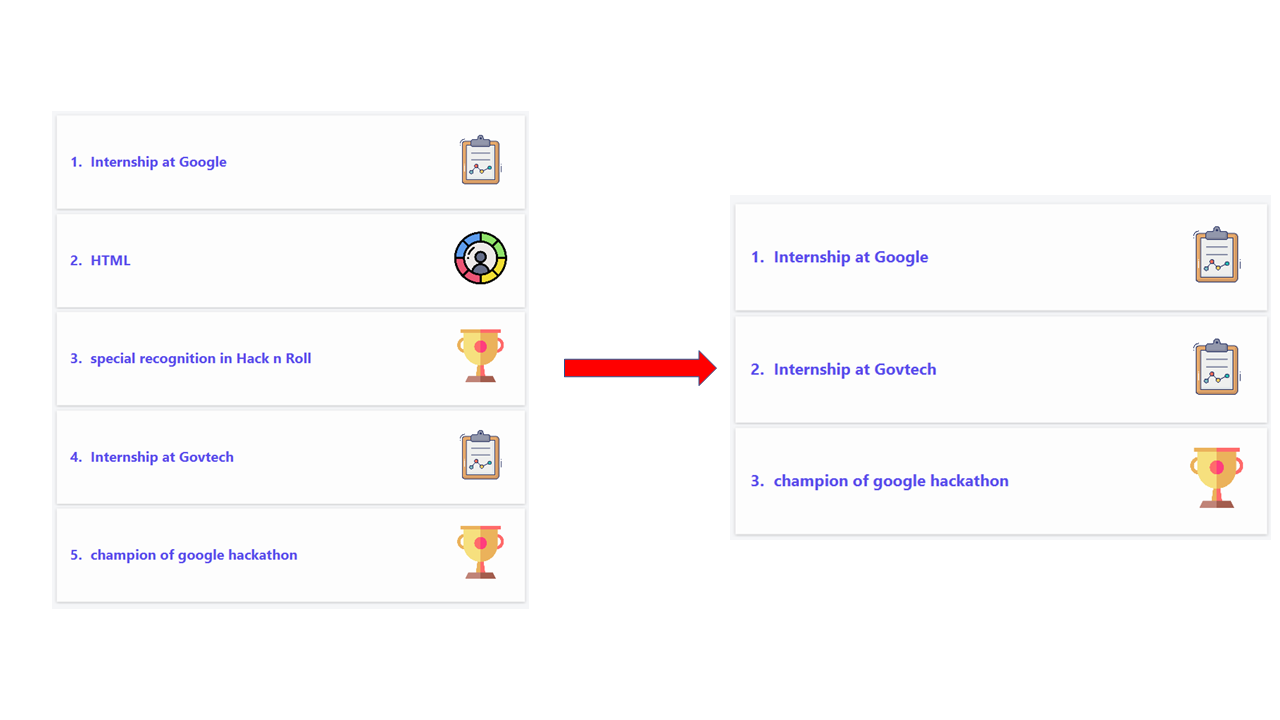
delete me 2- Executing
delete me 2on the following list will delete the 2nd profile item as follows:
Updating profile item details: edit me
Edit the experience, skills or achievements of your profile.
Format: edit me INDEX [t/TITLE] [c/CATEGORY] [d/DESCRIPTORS]
- At least one of the optional fields must be provided.
- Existing values will be updated to the input values.
- When editing
DESCRIPTORS, all existing descriptors get replaced by the new specified descriptors. - You can remove all
DESCRIPTORSby addingd/without anything after it.
Examples:
edit me 2 t/CSS c/skill d/learnt how to use flexbox- For example if you want to update the title and descriptor of the first item in your profile.
- Executing
edit me 1 t/Internship at Google d/Build a dashboardwill edit the profile item as follows:
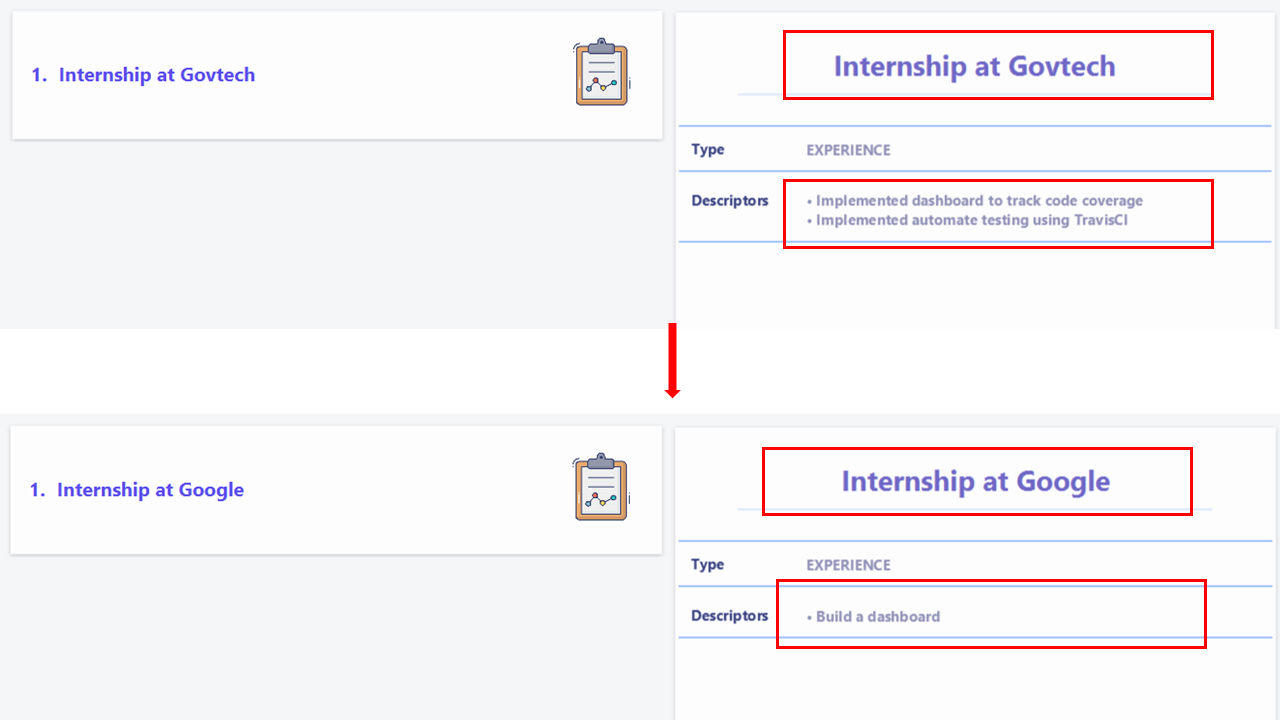
(Note that the existing descriptors get replaced)
Viewing a profile item’s details in full: view me
Selects an item in the profile to show in detail on the right panel.
Format: view me INDEX
Example:
view me 3- For example if you have the following profile items and you want to view the third item in your user profile. Executing
view me 3will show the following:
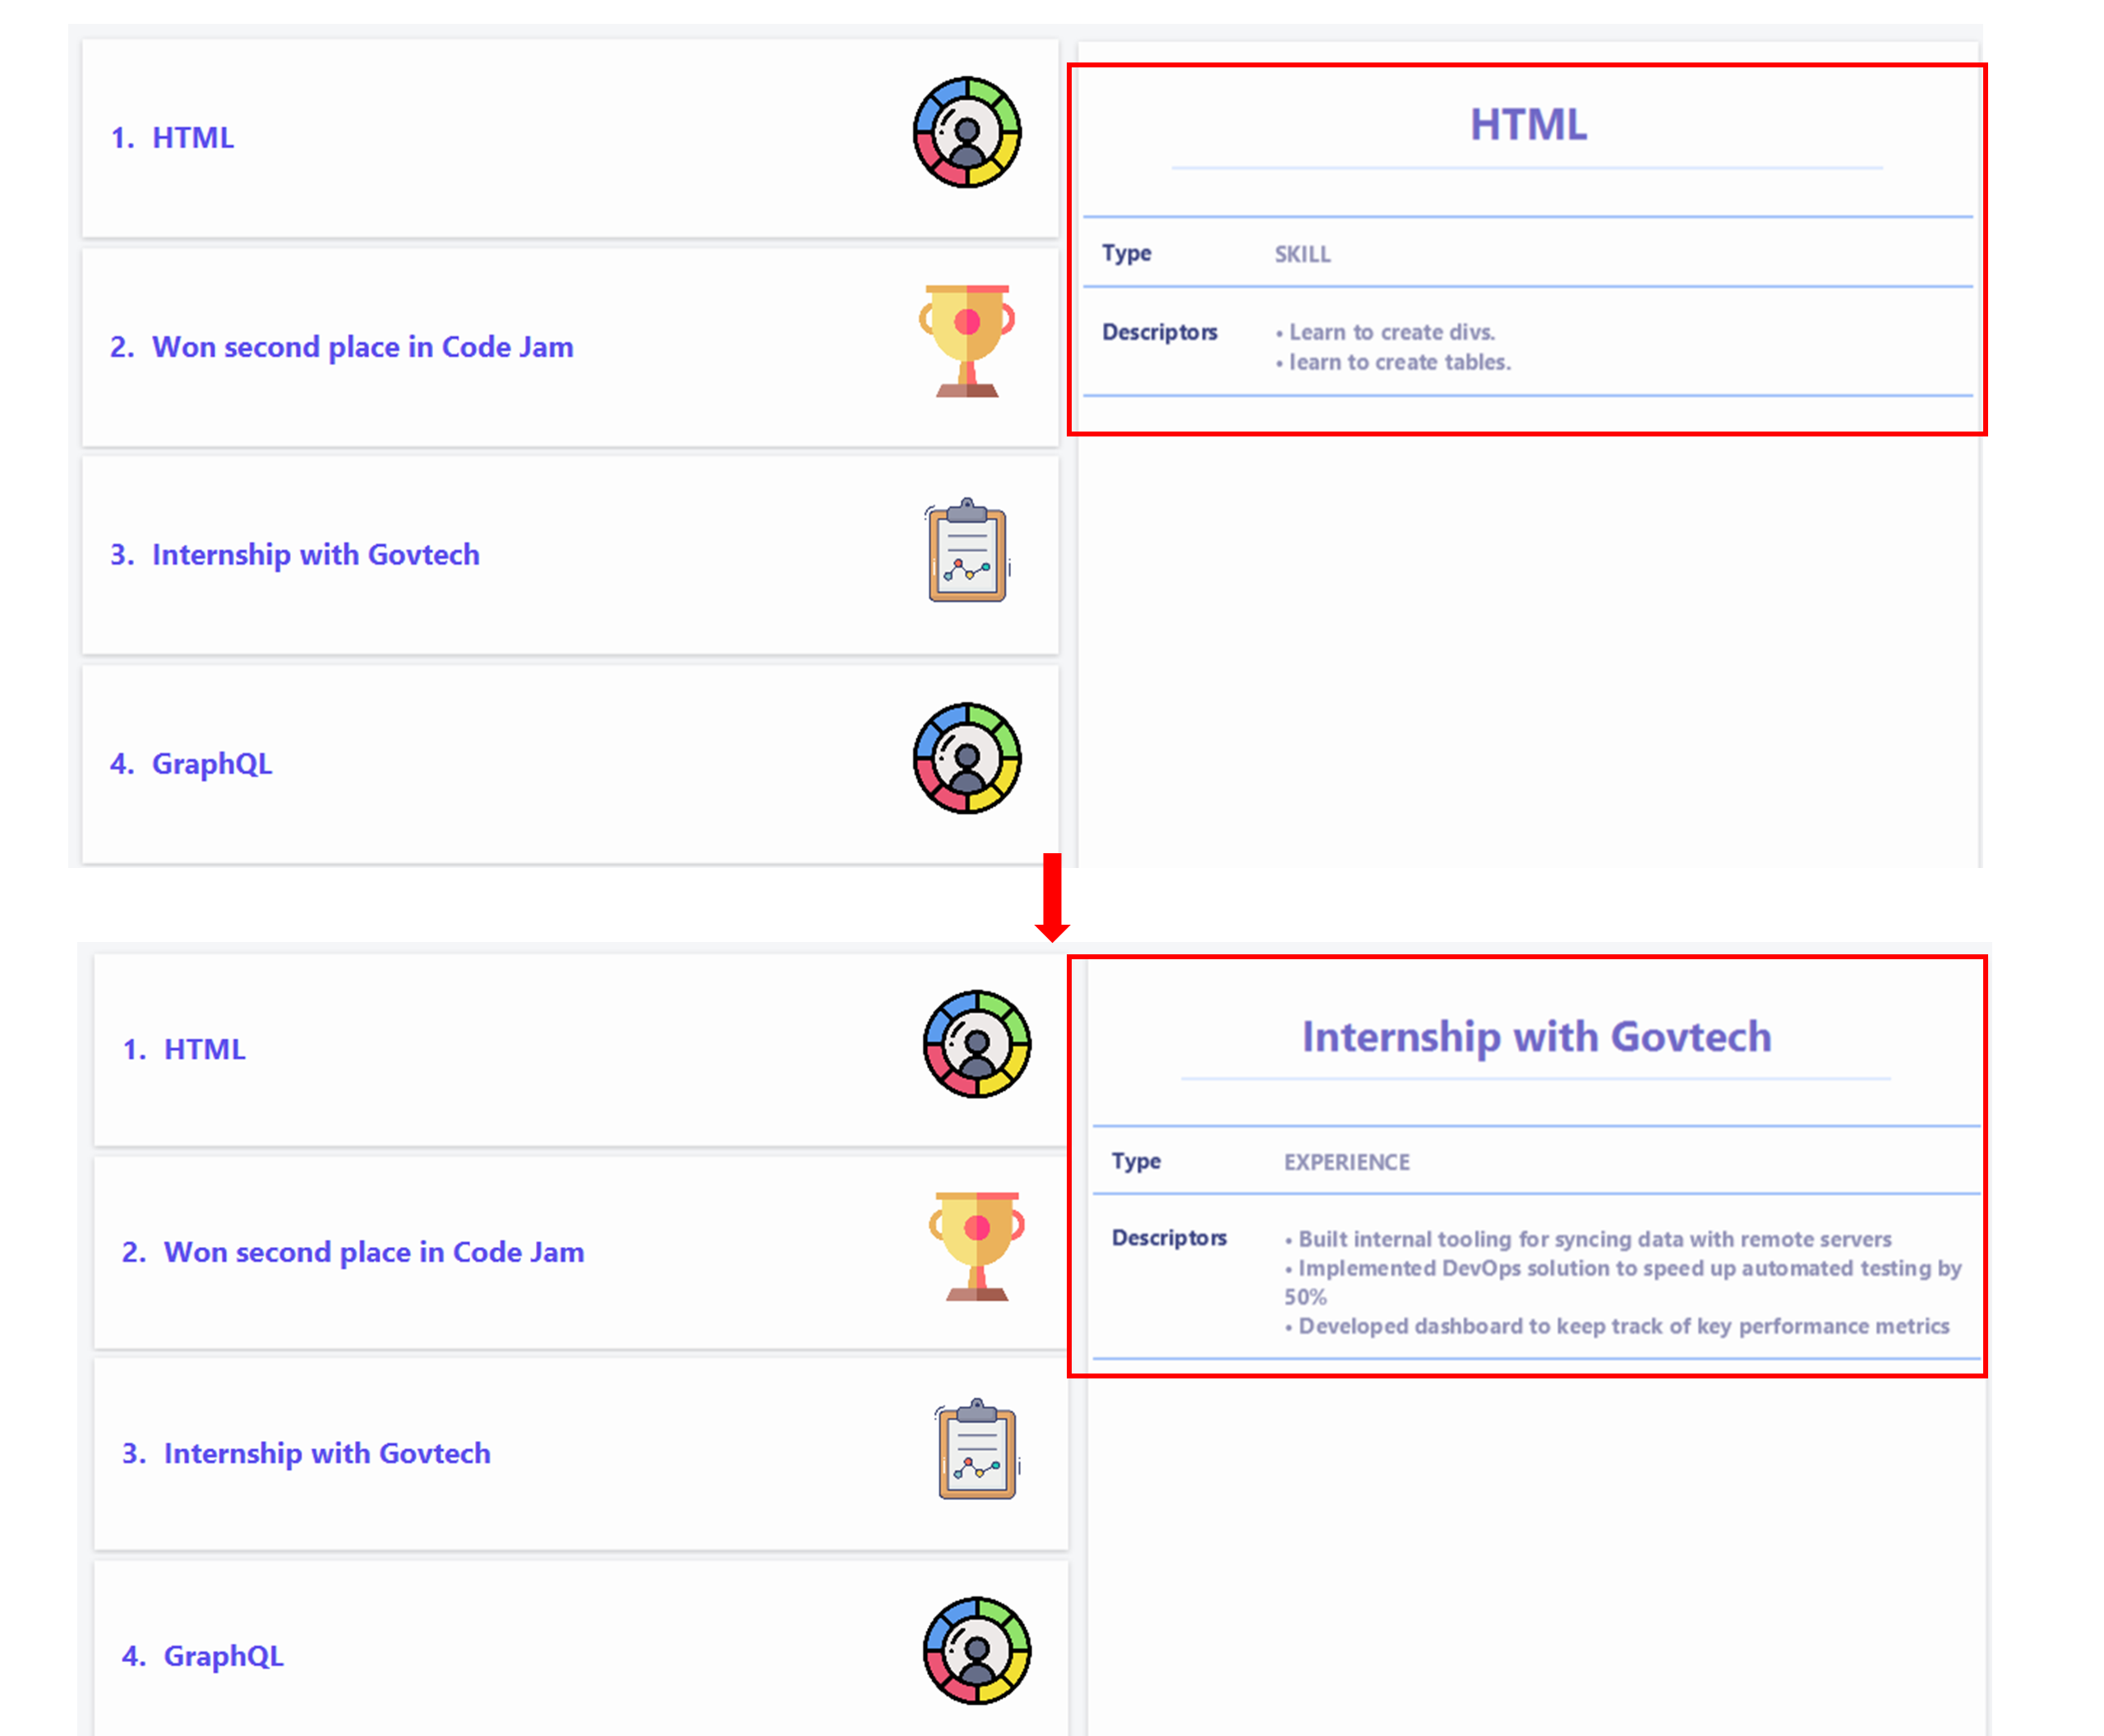
(As you can see the details of the third item can be seen in the right panel)
Finding items in profile: find me
Finds all items in your profile whose titles contain any of the specified keywords.
Format: find me KEYWORD [ANOTHER_KEYWORD]...
- Only the profile item’s title will be searched for.
- The search is case-insensitive. e.g.
HTMLwill match and return items withhtmlin its title. - Profile items with titles matching at least one keyword will be returned. e.g.
Hackathon Internshipwill return a list of profile items whose titles contain the wordHackathonorInternship. - The ordering of the keywords does not affect the outcome of the query. e.g.
Hackathon InternshipandInternship Hackathonwill return the same results. - Only full words will be matched. e.g.
Internwill not matchInternship.
![]() Note:
Note:
Upon successful execution of this command, your profile list will be updated to only show matching results. All
subsequent delete, edit and view profile commands will use indexing based on this updated list. Switching tabs will
not return the list to its full state. If you wish to return to seeing all the profile items in your list,
execute list me.
Examples:
- For the following example, if the profile contains the following items. Executing
find me internshipwill return the following:
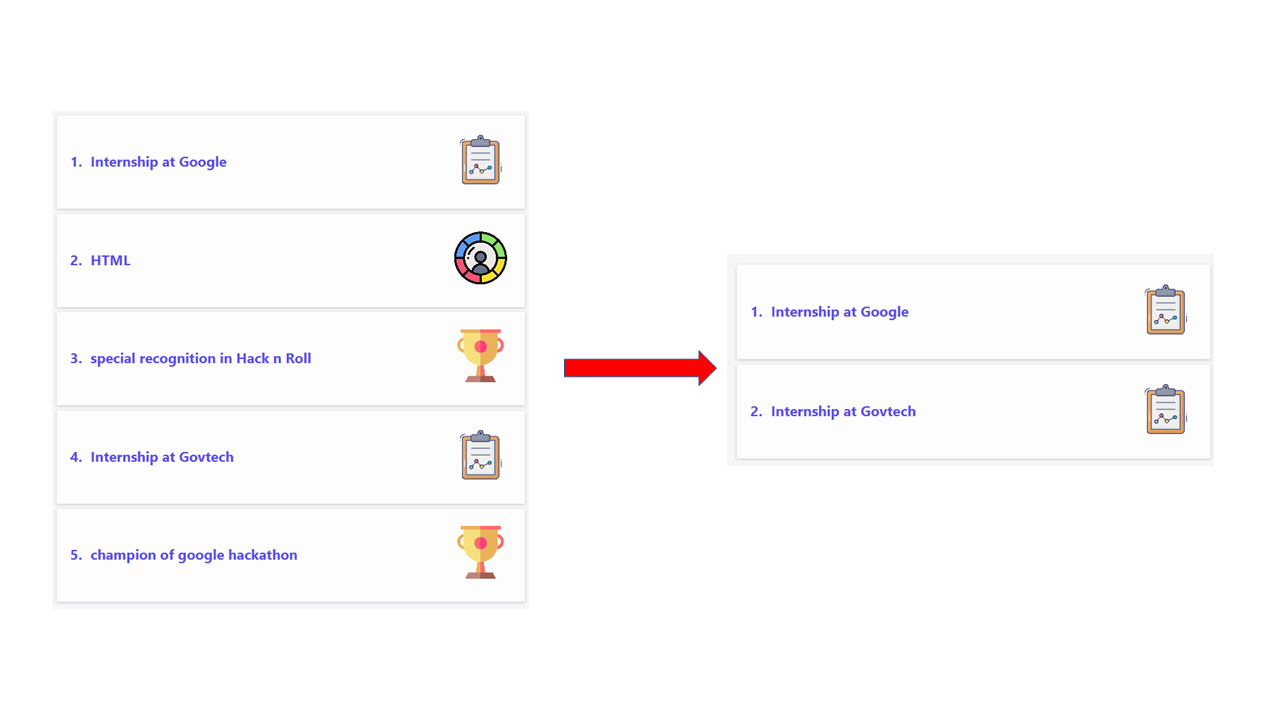
And executingfind me internship googlewill return the following:
(As you can see, the search results match at least one of the keywords specified regardless of its casing)
Listing all items in profile: list me
Lists out all items in your profile. After using the find me command, you would have likely filtered
your list of profile items down to a few search results. You can then use the list me command to revert to seeing
all the items in your profile.
Format: list me
Example:
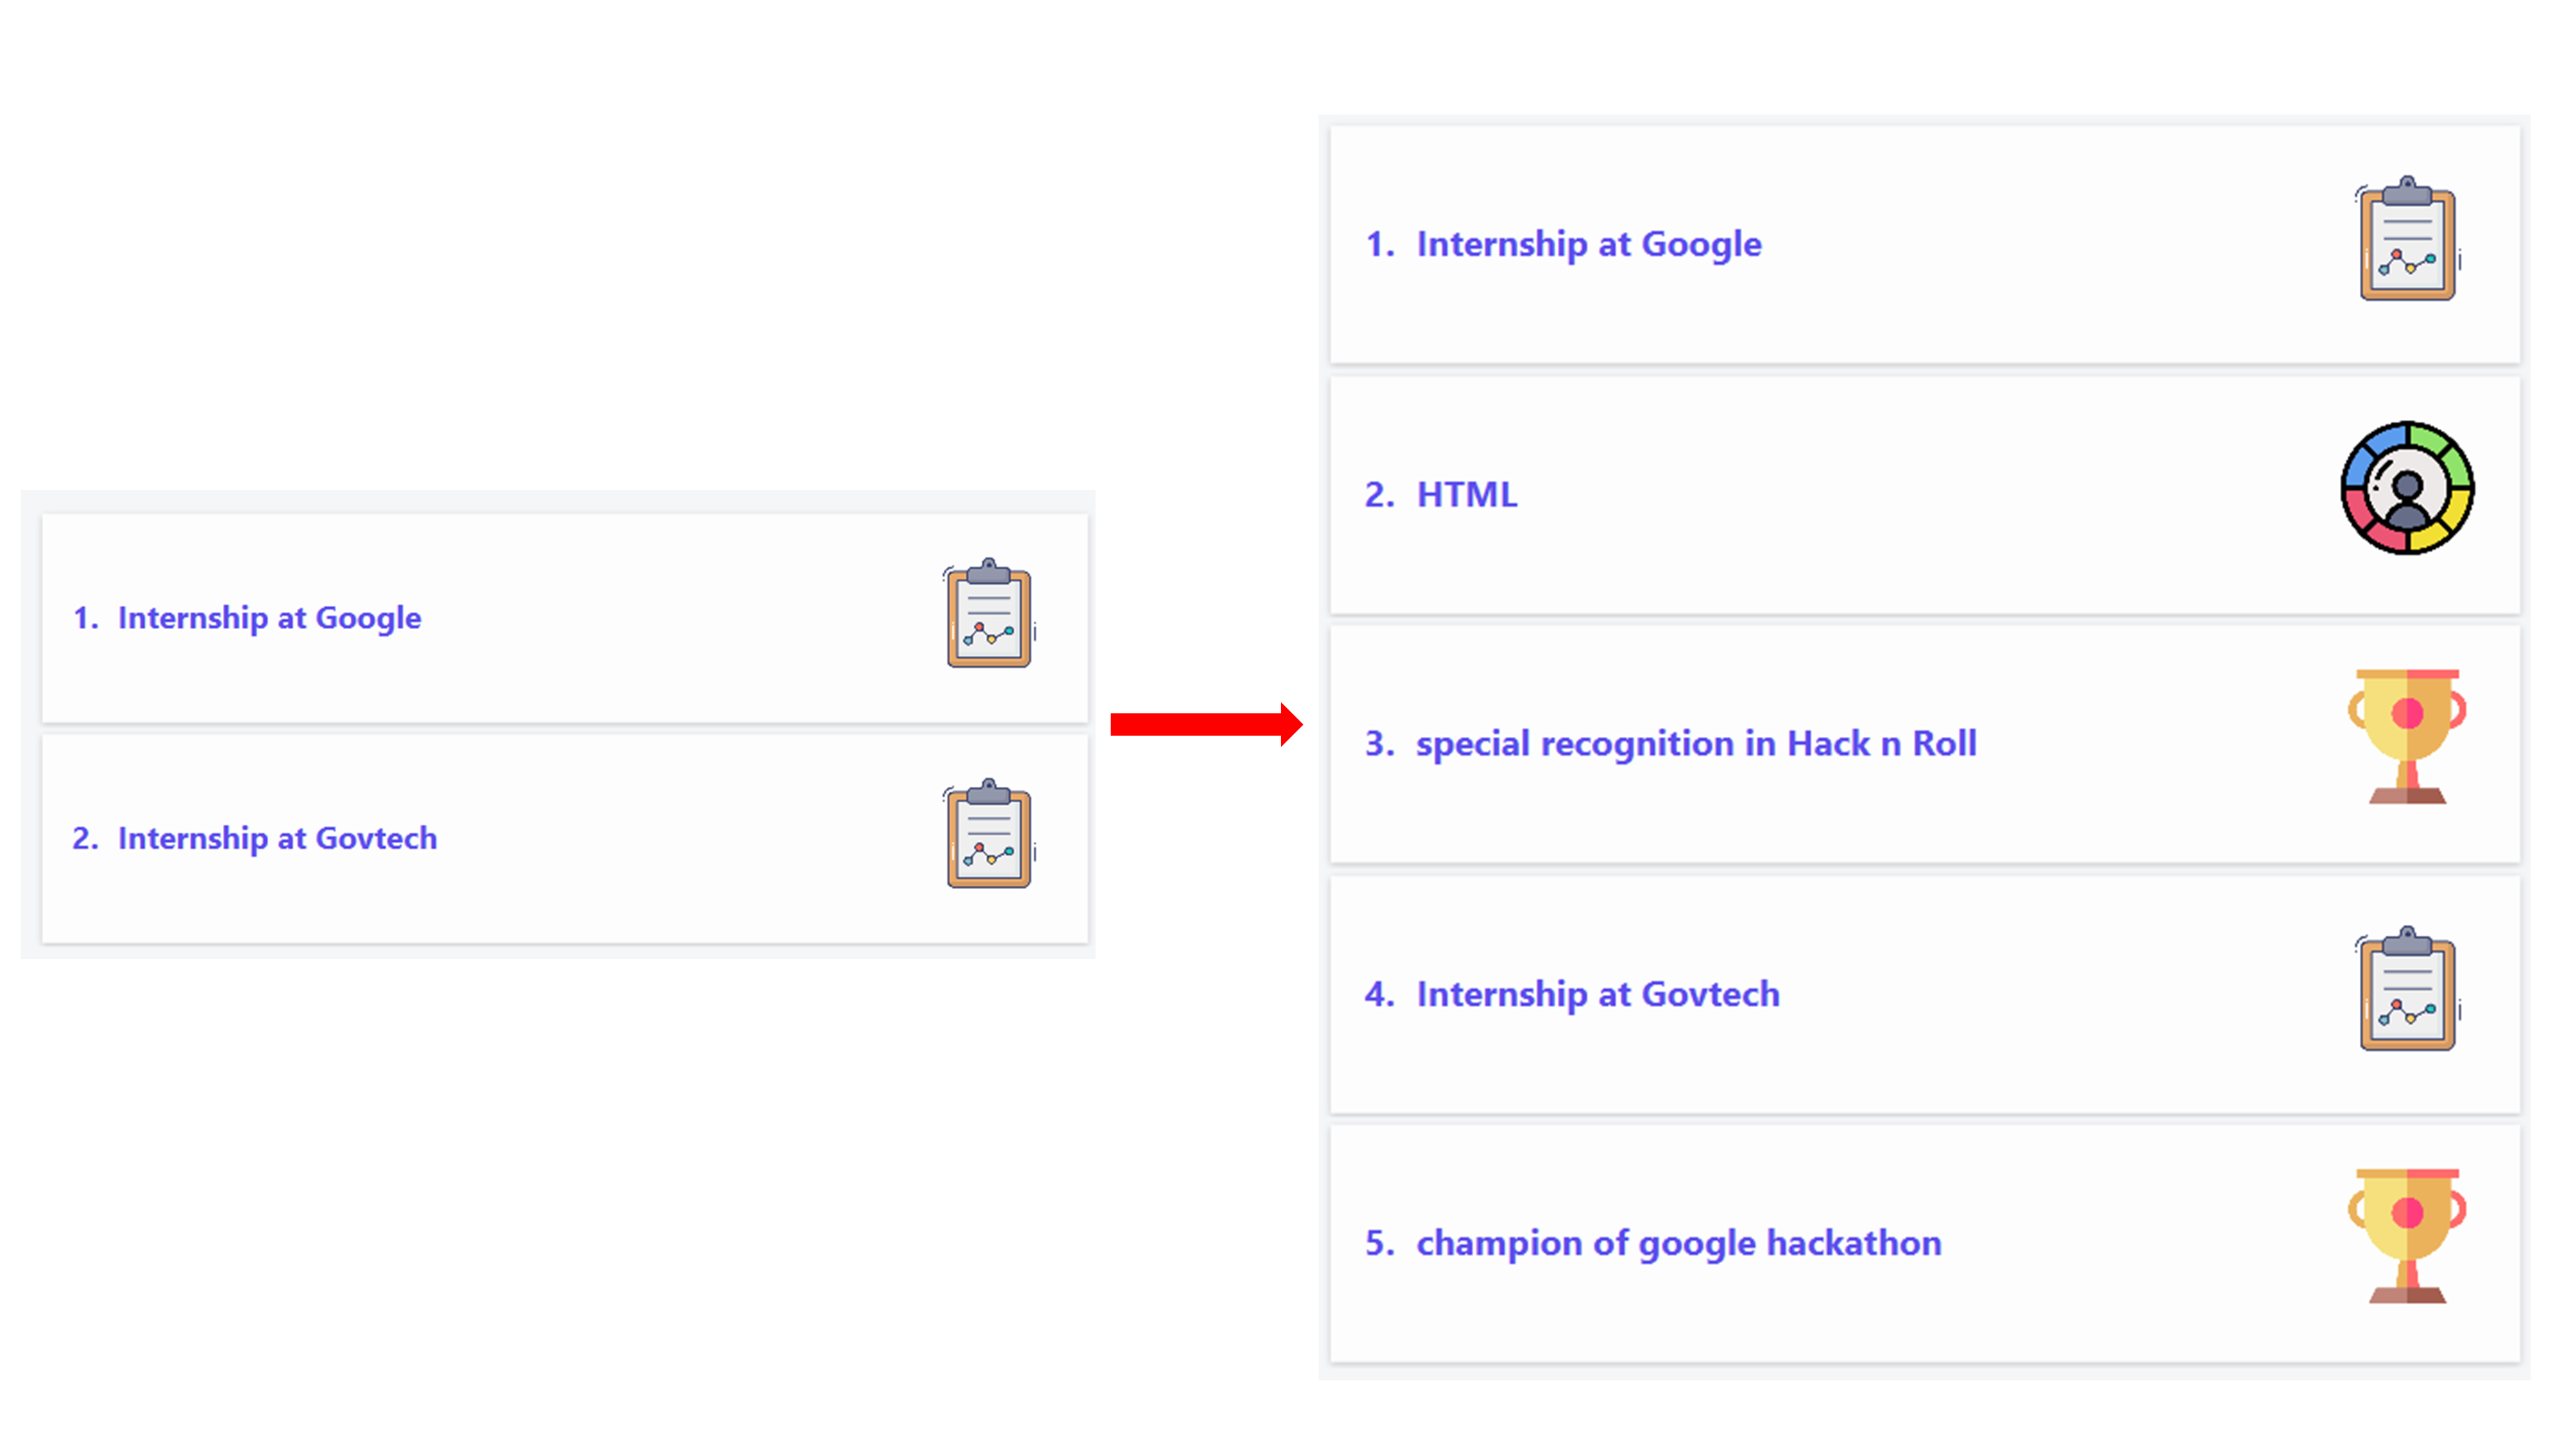
- If you have 5 items total in the profile list, and your list is currently only showing 2 profile items after
having executed a
find mecommand, to view all the items in your profile list, executelist me:
Finding the most suitable internships
Generating matching internships: match
Generates a list of internships that have requirements that matches your current set of skills.
Format: match
- Only the
Requirementfield in the internships will be searched for. - Only profile items with
skillcategory will be used for matching. - An Internship with at least one
Requirementmatching any oneskillin the profile list will be considered as a successful match. e.g. Say you have a profile item which is ofskillcategory and titledPython, any internship that has aRequirementofPythonwill be successfully matched. - An Internship with no requirements will never be matched.
- Matched internships can have requirements that do not match with the profile skills, since a match is found when an internship has at least one and not all requirements that matches with the profile skills.
- Matching done is case-insensitive. e.g.
Pythonwill matchpython. - Only the full phrase will be matched. e.g.
Machinewill not matchMachine Learning.
Example:
- Say you currently have these 2 list of internships from Google Singapore and Garena:

2. And this is your current profile item list. Note that only the 2 profile items of skill type will be used for
matching with the internships.

3. All that’s left to do is to type the match word in the command box.

4. A pop-up window showing the list of matching internships will be displayed!

General
Clearing all entries: clear
Clears all entries from InternHunter.
Format: clear
clear will clear all data, i.e. all companies, internships, applications and profile items.
Example:
- Suppose you want to clear all your data in InternHunter. Executing
clearwill clear all the data.
![]()
2. Note that all the data has been wiped as seen in the Ui.
![]()
Viewing help: help
Displays a link to the InternHunter user guide.
Format: help
Example:
- Suppose you can’t remember the commands. Fret not, executing
helpwill generate a new window containing the link to the user guide!

2. Copy the link and access our user guide for more information.

Exiting the program: exit
Shows an exit confirmation dialog.
Format: exit
For MacOS users, you can navigate the options using tab on your keyboard and pressing spacebar to confirm your choice.
For Windows and Linux users, similarly, you can use tab to navigate. However, instead of using spacebar, you should use enter instead.
Example:
- Suppose you want to exit InternHunter without clicking the cross button, executing
exitwill generate a new window to confirm your request of exiting.

2. At this stage, you have the option to confirm the exit or continue to stay in InternHunter.

FAQ
Where does InternHunter store its data?
By default, InternHunter will save all the information into a folder called “data” in the app’s home directory (i.e. the
folder in which you placed the app). The data is stored in 3 separate JSON files: applicationitemlist.json,
companyitemlist.json and profileitemlist.json.
How do I transfer my data to another computer I would like to run InternHunter on?
Simply copy the data folder from the app’s home directory and transfer it into the directory of the other computer in
which you’ve placed InternHunter. InternHunter will then be able to reuse this data.
Do I have to save my data manually?
There isn’t a need for you to manually save your data. InternHunter will automatically save your data while you are
running the app.
What happens if I accidentally clear all my data using clear?
InternHunter currently does not provide an undo command so it is not possible to retrieve any deleted data.
Make sure to run clear only if you are completely certain that you would like to delete all your data!
When does InternHunter use sample data?
InternHunter uses sample data when the user first launches the app. More specifically,
when all of applicationitemlist.json, companyitemlist.json, and profileitemlist.json are missing.
Why is my data missing?
Make sure your json files are in the correct folder and format. If not, InternHunter will use empty lists.
Command summary
Navigating InternHunter
| Action | Format |
|---|---|
| Switch | switch TYPE |
Company
| Action | Format |
|---|---|
| Add | add com n/COMPANY_NAME p/PHONE_NUMBER e/EMAIL a/ADDRESS [t/INDUSTRY]... |
| Delete | delete com INDEX |
| Edit | edit com INDEX [n/COMPANY_NAME] [p/PHONE_NUMBER] [e/EMAIL] [a/ADDRESS] [t/INDUSTRY]... |
| View | view com INDEX |
| Find | find com KEYWORD [ANOTHER_KEYWORD]... |
| List | list com |
Internship
| Action | Format |
|---|---|
| Add | add int INDEX j/JOB_TITLE [w/WAGE] [p/PERIOD] [r/REQUIREMENT]... |
| Delete | delete int INDEX i/INDEX |
| Edit | edit int INDEX i/INDEX [j/JOB_TITLE] [p/PERIOD] [w/WAGE] [r/REQUIREMENT]... |
Application
| Action | Format |
|---|---|
| Add | add app INDEX i/INDEX [s/STATUS] [d/STATUS_DATE] |
| Delete | delete app INDEX |
| Edit | edit app INDEX [s/STATUS] [d/STATUS_DATE] |
| View | view app INDEX |
| Find | find app KEYWORD [ANOTHER_KEYWORD]... |
| List | list app |
Profile
| Action | Format |
|---|---|
| Add | add me t/TITLE c/CATEGORY [d/DESCRIPTOR]... |
| Delete | delete me INDEX |
| Edit | edit me INDEX [t/TITLE] [c/CATEGORY] [d/DESCRIPTOR]... |
| View | view me INDEX |
| Find | find me KEYWORD [ANOTHER_KEYWORD]... |
| List | list me |
Finding the most suitable internships
| Action | Format |
|---|---|
| Match | match |
General
| Action | Format |
|---|---|
| Clear | clear |
| Help | help |
| Exit | exit |